Flare-On 9 solutions
This year, I participated in the Flare-On challenge organized by the FLARE team from Mandiant Google.
In total, 11 challenges of reverse engineering with increasing difficulty were to be solved. I did managed to resolve them all and as there was not a lot of activity on this blog recently, I pushed myself to put together some write-ups.
I want to thank all the challenge authors, especially the one who made the eighth challenge as it was reallly the hardest but also the one that I learned the most from.
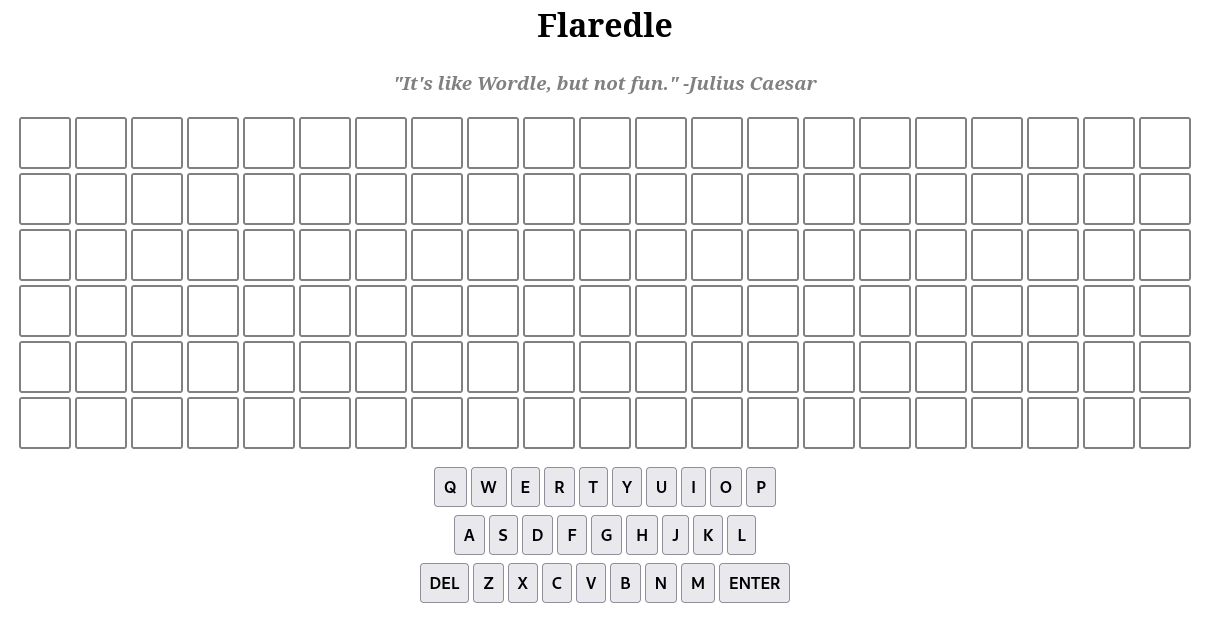
Welcome to Flare-On 9!

You probably won't win. Maybe you're like us and spent the year playing Wordle. We made our own version that is too hard to beat without cheating.

Play it live at: [http://flare-on.com/flaredle/](http://flare-on.com/flaredle/)
The first challenge is a Wordle-like game, developed using HTML and JavaScript.
If we look at the script.js file (corresponding to the game logic), we see the right guess is defined at the beginning of the script.
import { WORDS } from "./words.js";

const NUMBER_OF_GUESSES = 6;
const WORD_LENGTH = 21;
const CORRECT_GUESS = 57;
let guessesRemaining = NUMBER_OF_GUESSES;
let currentGuess = [];
let nextLetter = 0;
let rightGuessString = WORDS[CORRECT_GUESS];
[...]
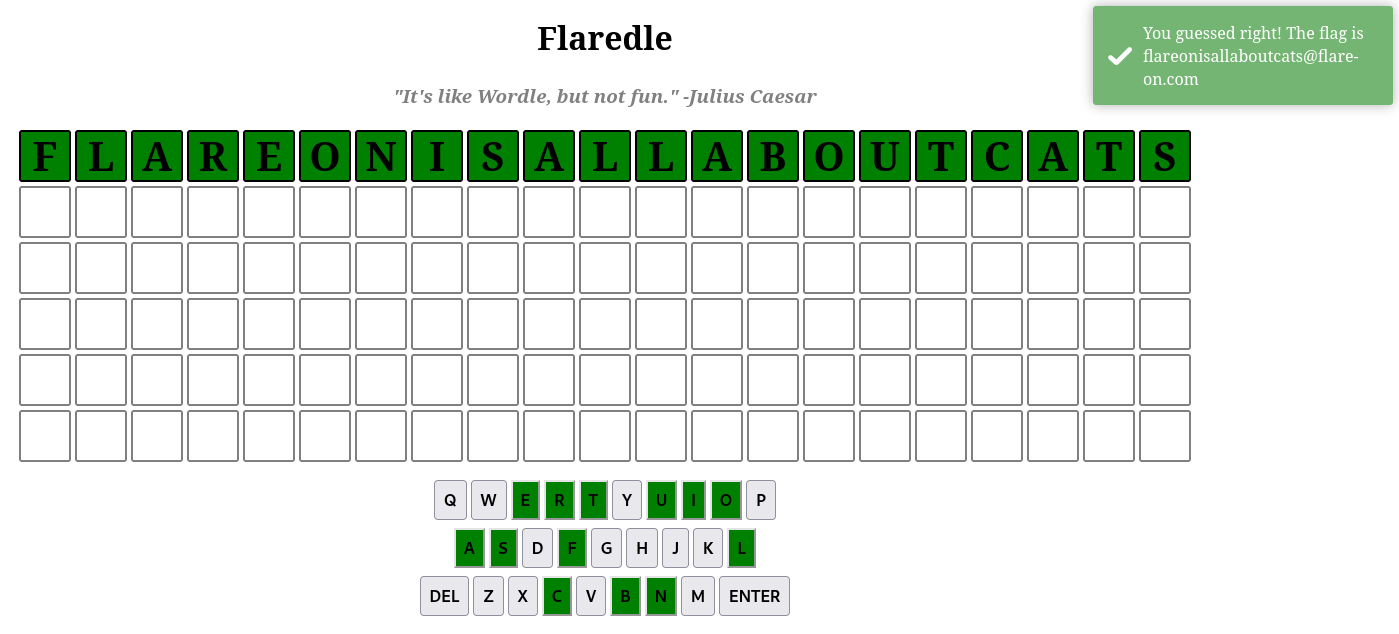
By resolving the word in words.js, we get flareonisallaboutcats, which immediately gives the flag.
I said you wouldn't win that last one. I lied. The last challenge was basically a captcha. Now the real work begins.
Shall we play another game?
For this challenge, we have a PE executable to analyze.
$ file PixelPoker.exe
PixelPoker.exe: PE32 executable (GUI) Intel 80386, for MS Windows
When executed, a picture is showed and we have to click on a specific pixel to get the flag. If we miss more than 10 times, a popup is displayed.
After opening the executable in IDA, we can easily retrieve the function responsible for creating the window (at 0x401120) and the associated callback (at 0x4012c0).
When the user clicks on a pixel, the callback checks the x and y coordinates of the pixel against the result of a modulo operation on hardcoded values. Here is a Python implementation of the check.
import struct

s = b"FLARE-On"

assert x == struct.unpack("I", s[:4])[0] % 0x2e5 # 95
assert y == struct.unpack("I", s[4:])[0] % 0x281 # 313
Clicking on the pixel at (95, 313) gives the flag.
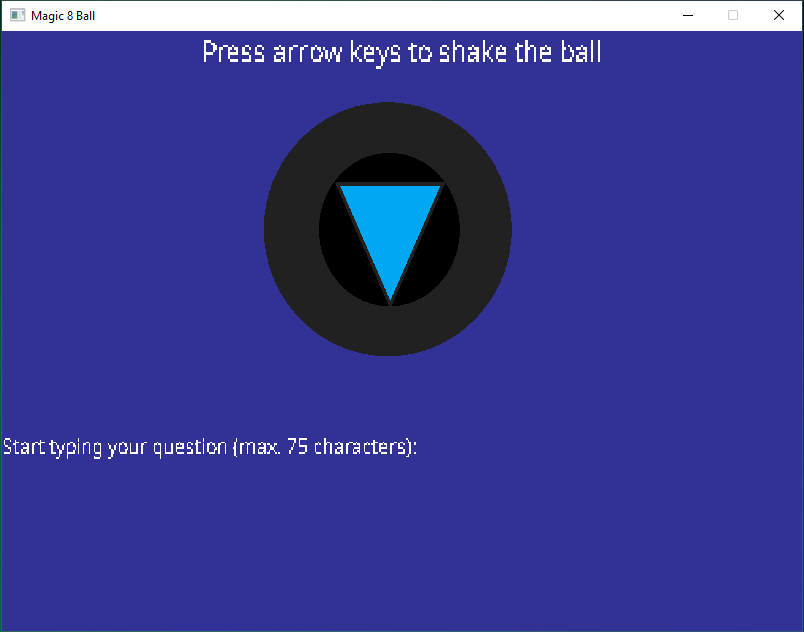
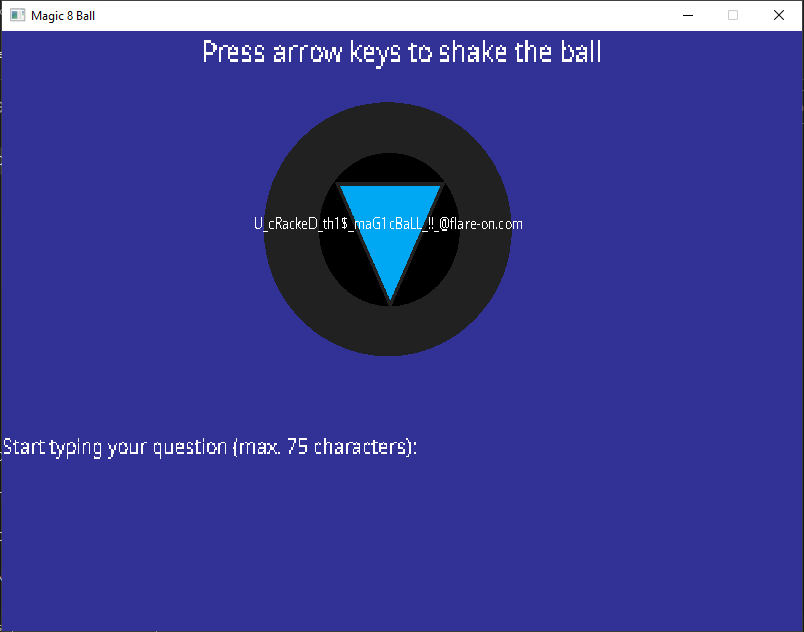
You got a question? Ask the 8 ball!
The third challenge is a PE executable dynamically linked with several DLLs, including the SDL (generally used to develop computer games).
$ file Magic8Ball.exe
Magic8Ball.exe: PE32 executable (GUI) Intel 80386, for MS Windows
When executed, the program waits for a combination of arrow keys and a question.
After opening the executable in IDA, we can identify the function at 0x2924E0 as the one checking the user input.
By statically analyzing this function, we retrieve the combination of arrow keys (LLURULDUL) to ask the question that gives us the flag (gimme flag pls?). Note that the question is set by the function at 0x292090.
"If it crashes its user error." -Flare Team
This challenge is a PE executable that waits for a specific command line parameter.
$ file darn_mice.exe
darn_mice.exe: PE32 executable (console) Intel 80386, for MS Windows
When executed with a dummy input, we get the following output.
> .\darn_mice.exe AAAAAAAAAAAAAAAAAAAAAAA
On your plate, you see four olives.
You leave the room, and a mouse EATS one!
By doing static analysis, we can see that the user input is used as a key to decrypt the flag.
Also, the input has to verify several conditions:
- input length is equal to 35 bytes;
- input is printable;
- when adding a byte of the input to a byte of a hardcoded sequence, we get an executable function which is immediately called (see screenshot of the corresponding decompiled code below).
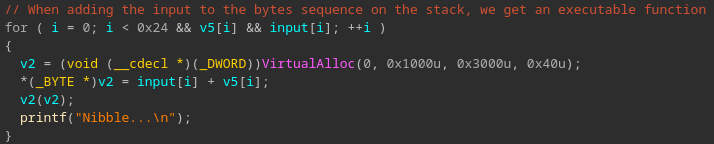
The last condition is the most important one as there is only one possibility to respect it: the called instruction has to be a ret. Meaning that the sum of each input byte and a byte of the hardcoded sequence has to be equal to 0xc3.
From there, it is trivial to get the user input using a few lines of Python.
hardcoded_seq = bytes.fromhex("505E5EA34F5B515E5E97A38090A38090A38090A38090A38090A38090A38090A2A36B7F")

ret = 0xc3
user_input = []
for i in range(len(hardcoded_seq)):
    user_input.append(ret - hardcoded_seq[i])

print(bytes(user_input).decode())
This script gives the encryption key see three, C3 C3 C3 C3 C3 C3 C3! XD and the latter gives us the flag.
> .\darn_mice.exe "see three, C3 C3 C3 C3 C3 C3 C3! XD"
On your plate, you see four olives.
You leave the room, and a mouse EATS one!
Nibble...
Nibble...
Nibble...
Nibble...
Nibble...
Nibble...
Nibble...
Nibble...
Nibble...
Nibble...
Nibble...
Nibble...
Nibble...
Nibble...
Nibble...
Nibble...
Nibble...
Nibble...
Nibble...
Nibble...
Nibble...
Nibble...
Nibble...
Nibble...
Nibble...
Nibble...
Nibble...
Nibble...
Nibble...
Nibble...
Nibble...
Nibble...
Nibble...
Nibble...
Nibble...
When you return, you only: see three, C3 C3 C3 C3 C3 C3 C3! XD
i_w0uld_l1k3_to_RETurn_this_joke@flare-on.com
FLARE FACT #823: Studies show that C++ Reversers have fewer friends on average than normal people do. That's why you're here, reversing this, instead of with them, because they don't exist.

We’ve found an unknown executable on one of our hosts. The file has been there for a while, but our networking logs only show suspicious traffic on one day. Can you tell us what happened?
For this challenge, we get a PE executable and a PCAP capture.
$ file t8.exe traffic.pcapng
t8.exe:         PE32 executable (console) Intel 80386, for MS Windows
traffic.pcapng: pcapng capture file - version 1.0
As mentioned in the description, the executable is a fake backdoor developed in C++.
Starting from the main() function, the backdoor performs the following actions.
- Decrypts (one-byte XOR) the domain name of the Command and Control server (
flare-on.com). - Instantiate a
CClientSockobject, this is a custom class responsible for communicating with the Command and Control server (via HTTP). - Set the HTTP request type of the object to
POST. - Compute the MD5 hash of the
FO9string concatenated with a random number, and use the resulting hash as a RC4 key. - Encrypt the payload (
ahoy) using the previous RC4 key and encode the result using base64. - Append the random number used to build the RC4 key to the User-Agent of the request.
- Send the request to the Command and Control server.
- Decode (base64) and decrypt the response using the same RC4 key.
- Parse and decode the decrypted response using a custom algorithm.
- Compute the MD5 hash of the concatenation of the previous step result and
@flare-on.com(which gives the flag basically), the resulting hash is used as a second RC4 key. - Encrypt the payload (
sce) using this new RC4 key, encode the result using base64 and send the request to the Command and Control server. - Decode (base64) and decrypt (second key) the response.
- The decrypted response corresponds to a shellcode, which is immediately mapped and executed.
The first goal was to retrieve the initial RC4 key. This requires to extract the random number appended to the User-Agent of the first request from the PCAP.

Retrieving the initial RC4 key can be done in a few lines of Python. Note that the strings are wide.
import hashlib

to_wide = lambda x : x.encode("utf-16")[2:]

rand_num = 11950

m = hashlib.md5()
m.update(to_wide("FO9") + to_wide(str(rand_num)))
print(m.hexdigest()) # a5c6993299429aa7b900211d4a279848
Once we have the initial RC4 key, we can decode, decrypt and parse the response to the first request.
As the algorithm used to decode the decrypted response was a bit painful to reverse (see code at 0x404570), I used the Appcall feature of IDA to instrument the function.
import struct
import ida_idd
from base64 import b64decode
from Crypto.Cipher import ARC4

upck32 = lambda x : struct.unpack("I", x)[0]

rc4_key = "a5c6993299429aa7b900211d4a279848".encode('utf-16')[2:]
response = b"TdQdBRa1nxGU06dbB27E7SQ7TJ2+cd7zstLXRQcLbmh2nTvDm1p5IfT/Cu0JxShk6tHQBRWwPlo9zA1dISfslkLgGDs41WK12ibWIflqLE4Yq3OYIEnLNjwVHrjL2U4Lu3ms+HQc4nfMWXPgcOHb4fhokk93/AJd5GTuC5z+4YsmgRh1Z90yinLBKB+fmGUyagT6gon/KHmJdvAOQ8nAnl8K/0XG+8zYQbZRwgY6tHvvpfyn9OXCyuct5/cOi8KWgALvVHQWafrp8qB/JtT+t5zmnezQlp3zPL4sj2CJfcUTK5copbZCyHexVD4jJN+LezJEtrDXP1DJNg=="

response_dec = ARC4.new(rc4_key).decrypt(b64decode(response))

flag = []
for chunk in response_dec.split(b",\x00"):
    dec_chunk = ida_idd.Appcall.decode_chunk(upck32(chunk[:4]), upck32(chunk[4:8]), upck32(chunk[8:12]), upck32(chunk[12:]))
    dec_char = ida_idd.Appcall.chunk_to_char(dec_chunk)
    flag.append(dec_char)

print(bytes(flag).decode() + "@flare-on.com")
The execution of this script in a debug session gives the flag i_s33_you_m00n@flare-on.com.
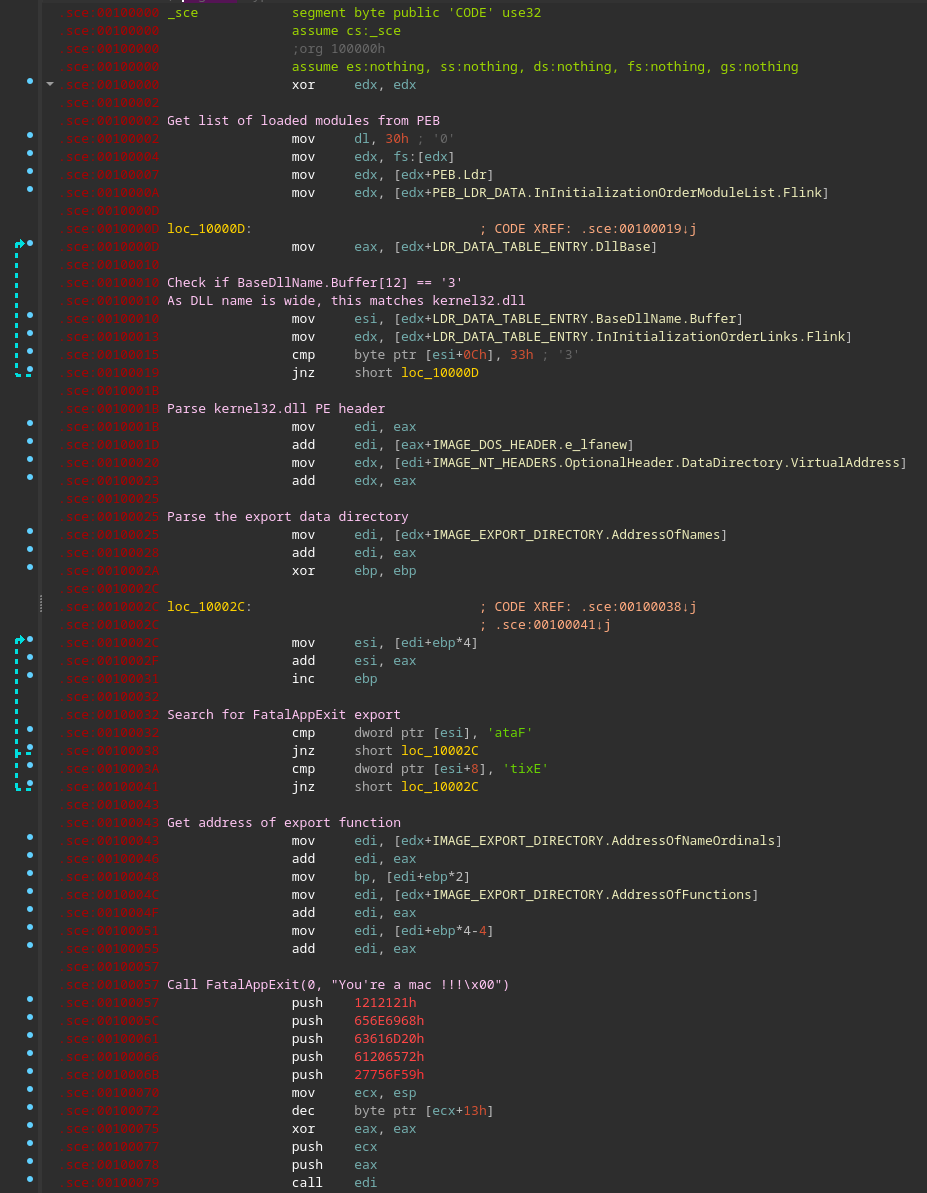
At this point, the challenge was already finished but I wanted to know what the shellcode does, so I decrypted it.
import hashlib
from base64 import b64decode
from Crypto.Cipher import ARC4

to_wide = lambda x : x.encode("utf-16")[2:]

m = hashlib.md5()
m.update(to_wide("i_s33_you_m00n@flare-on.com"))
rc4_key = to_wide(m.hexdigest())

response = b"F1KFlZbNGuKQxrTD/ORwudM8S8kKiL5F906YlR8TKd8XrKPeDYZ0HouiBamyQf9/Ns7u3C2UEMLoCA0B8EuZp1FpwnedVjPSdZFjkieYqWzKA7up+LYe9B4dmAUM2lYkmBSqPJYT6nEg27n3X656MMOxNIHt0HsOD0d+"

shellcode = ARC4.new(rc4_key).decrypt(b64decode(response))

with open("shellcode.bin", "wb") as f:
    f.write(shellcode)
Turns out, the shellcode is not that interesting (call to FatalAppExit(0, "You're a mac !!!\x00")). Here is a commented version of the disassembled shellcode.
FLARE FACT #824: Disregard flare fact #823 if you are a .NET Reverser too.

We will now reward your fantastic effort with a small binary challenge. You've earned it kid!
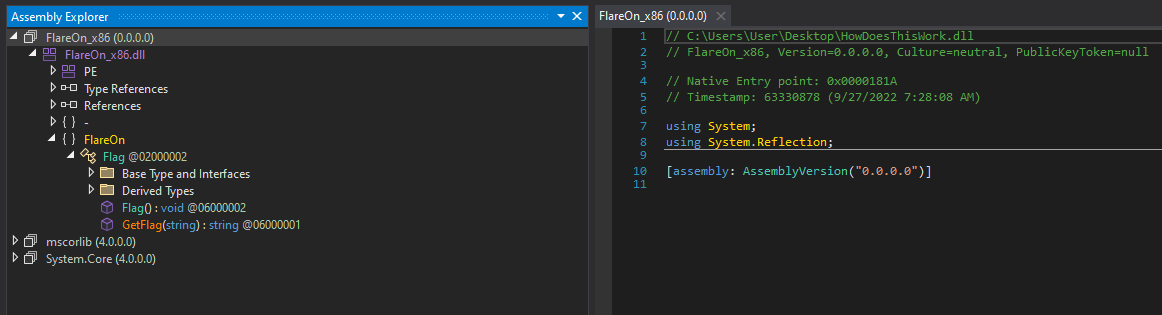
For this challenge, we have a PE DLL written in .NET and a text file corresponding to a chat log with the incident response team.
$ file HowDoesThisWork.dll IR\ chat\ log.txt
HowDoesThisWork.dll: PE32 executable (DLL) (GUI) Intel 80386 Mono/.Net assembly, for MS Windows
IR chat log.txt:     ASCII text, with CRLF line terminators
Here are the contents of the IR chat log.txt file.
[FLARE Team]  Hey IR Team, it looks like this sample has some other binary that might interact with it, do you have any other files that might be of help.

[IR Team]     Nope, sorry this is all we got from the client, let us know what you got.
After opening the executable in dnSpy, one can notice that the entry point indicated by the dnSpy (0x0000181A) is a native entry point. This means this address does not point to managed code (.NET code) but to unmanaged code (x86 assembly in this case).
At this point, I switched to IDA to continue the analysis. The code at 0x1000181A corresponds to a classic DLL entry point, it is trivial to identify the DllMain() at 0x10001163. The latter does two things:
- resolve several Windows API by parsing the module list from the PEB (the API names are encrypted with a one-byte XOR);
- start the main thread.
The main thread creates a named pipe \\.\pipe\FlareOn and read from it. If it receives the string MyV0ic3! then the flag is decryted (using RC4) and written on the pipe.
One thing to note is the reuse of the same RC4 stream to decrypt the string MyV0ic3! and the flag (see the script below).
from Crypto.Cipher import ARC4

rc4_key = bytes.fromhex("558BEC83EC20EBFE")
cipher = ARC4.new(rc4_key)

passwd = cipher.decrypt(bytes.fromhex("3E3951FBA211F7B92C"))
flag = cipher.decrypt(bytes.fromhex("E160A118932E96AD73BB4A92DE180AAA4174ADC01D9F3F19FF2B02DBD1CD1A"))
print(flag.decode())
The resulting flag is M1x3d_M0dE_4_l1f3@flare-on.com.
Interestingly, the first 6 bytes of the RC4 key match a classic prologue of a x86 function.
You've made it so far! I can't believe it! And so many people are ahead of you!
This challenge is a (very) large PE executable.
$ file anode.exe
anode.exe: PE32+ executable (console) x86-64, for MS Windows
$ ls -lh anode.exe
-rw-r--r--. 1 user user 55M Sep 26 14:08 anode.exe
Looking at the strings of the executable shows that this is actually a Node.js application built using nexe.
The first step consists to extract the embedded JS script. This can be done either using strings or the npm package nexe-decompile. By using one of these methods, we get a large JS script.
When executed, the script asks for the flag (size is 44 bytes) and enters a large switch statement (1024 cases in total) where each case modifies a byte of the input by a combination of other bytes of the input.
case 306211:
	if (Math.random() < 0.5) {
		b[30] -= b[34] + b[23] + b[5] + b[37] + b[33] + b[12] + Math.floor(Math.random() * 256);
		b[30] &= 0xFF;
	} else {
		b[26] -= b[24] + b[41] + b[13] + b[43] + b[6] + b[30] + 225;
		b[26] &= 0xFF;
	}
	state = 868071080;
	continue;
At the end of the switch statement, the modified input is checked against an hardcoded sequence.
var target = [106, 196, 106, 178, 174, 102, 31, 91, 66, 255, 86, 196, 74, 139, 219, 166, 106, 4, 211, 68, 227, 72, 156, 38, 239, 153, 223, 225, 73, 171, 51, 4, 234, 50, 207, 82, 18, 111, 180, 212, 81, 189, 73, 76];
if (b.every((x,i) => x === target[i])) {
	console.log('Congrats!');
} else {
	console.log('Try again.');
}
In addition to these large equations to solve, the math module of Node.js was tampered with:
ifstatements that depends on integers only have a different behavior depending on the integer (see the example below);
// something strange is happening...
if (1n) {
    console.log("uh-oh, math is too correct...");
    process.exit(0);
}
Math.random()is not so random as two consecutive executions of the executable produce the same “random” numbers.
At this point, I had an idea on how I could solve this challenge but my solution required to know which modifications were done in the math module.
My first attempt was to do static analysis of the module in IDA to understand the modifications. However, I quickly gave up this idea as there are way too many functions to look at, and I did not manage to identify the ones that could be of interest.
After that, I thought to compile the same version of Node.js using nexe and then do some binary diffing with the executable, but I was not sure to get good results.
Instead, I chose to modify a bit the embedded script to leak two things:
- the “random” numbers generated by
Math.random(); - the result of the
ifconditions present in the script.
For the former, I replaced some code at the beginning of the JS script with a for loop of 10000 iterations that prints (using console.log()) the result of Math.random() on stdout (redirected to a file named math_random.txt).
For the latter, I extracted all the numbers present in if conditions in the script, and gave the list to the following script (via the if_cond.txt file).
import subprocess

PATCH_OFFSET = 0x35e3874

with open("if_cond.txt", "r") as f:
    conditions = [line.strip() for line in f]

for cond in conditions:
    data_to_patch = b"  if (" + cond.encode() + b") {\n    console.log(1);\n  }\n\n\n\n\n\n\n"

    with open("anode_patched.exe", "rb") as f:
        data = bytearray(f.read())

    for i in range(len(data_to_patch)):
        data[PATCH_OFFSET+i] = data_to_patch[i]

    with open("anode_patched.exe", "wb") as f:
        f.write(data)

    proc = subprocess.Popen(['anode_patched.exe'], stdout=subprocess.PIPE)
    output = proc.stdout.read().strip().decode()

    if not output:
        output = "0"

    print("{}:{}".format(cond, output))
This Python script patches the JS script with a test on each extracted number, and executes the application (using the subprocess module). If it prints 1 then the number corresponds to a True, otherwise, to a False. Again, those results are written on the stdout, which is redirected to a file (named if_cond_results.txt).
Once I had these two files (math_random.txt and if_cond_results.txt), the next step was to extract and parse the equations.
Here is the algorithm I used for each case of the switch statement.
- Compute the case number from the state value (requires the
math_random.txt). - If the case number is
185078700(case that breaks thewhileloop) then stop the algorithm. - Get the offset of the switch case in the JS script (using regex).
- Identify and resolve the
ifstatement (either a check onMath.random()or an integer) after the case (still using regex). - Depending on the taken branch, extract the corresponding equation (regex again).
- If necessary, replace the call to
Math.random()in the equation by the actual value. - Extract the next state value and go back to step 1.
Obviously, the algorithm starts with the initial state value used by the script (1337), so it follows the actual execution flow of the script (which is quite important to correcly solve the equations).
The last step consists to solve the resulting equations. I chose to use z3.
Before using the solver, I had to clean the equations a bit, espcially:
- differentiate the versions a one byte of the flag (as each byte is rewritten several times);
- replace the
=symbol with==; - add logical AND with
0xFFbecause operations are done on bytes only.
Also, I had some specificities of z3 to deal with:
- each version of a byte of the flag needs to be repesented by a
z3variable (aBitVecin my case); - using
eval()to add the equations (which arestrobjects) in the solver.
The final script is available on GitHub.
$ time python solve.py
n0t_ju5t_A_j4vaSCriP7_ch4l1eng3@flare-on.com

________________________________________________________
Executed in    3.24 secs    fish           external
   usr time    3.07 secs  392.00 micros    3.07 secs
   sys time    0.15 secs  204.00 micros    0.15 secs
I'm such a backdoor, decompile me why don't you...
The eighth challenge is a PE executable written in .NET.
$ file FlareOn.Backdoor.exe
FlareOn.Backdoor.exe: PE32 executable (console) Intel 80386 Mono/.Net assembly, for MS Windows
When the executable is opened in dnSpy, we quickly understand that something is wrong as some methods cannot be decompiled.
Looking more closely at the other functions of the executable, we can divide them into two categories.
flare_XX(): classic C# bytecode, can be decompiled using dnSpy.flared_XX(): obfuscated/encrypted methods.

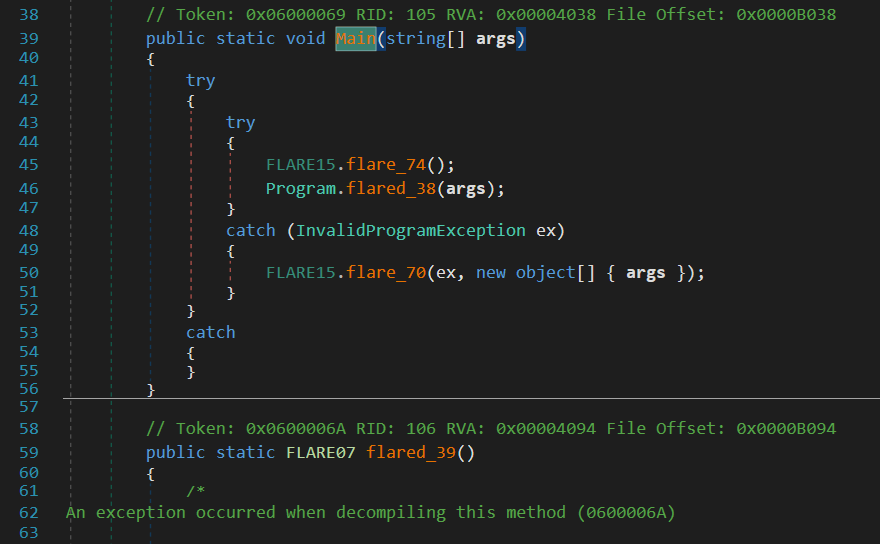
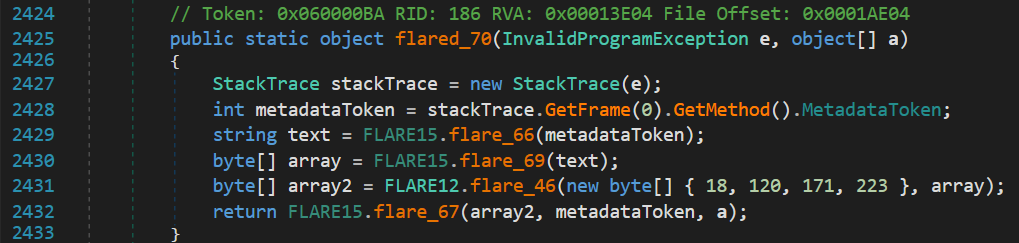
If we follow the execution flow from the Main() function, the function FLARE15.flare_74() is called to initialize several global arrays and returns normally. Then, the call to Program.flared_38() raises an exception (InvalidProgramException) as the method is invalid. The exception is catched and leads to the execution of FLARE15.flare_70().
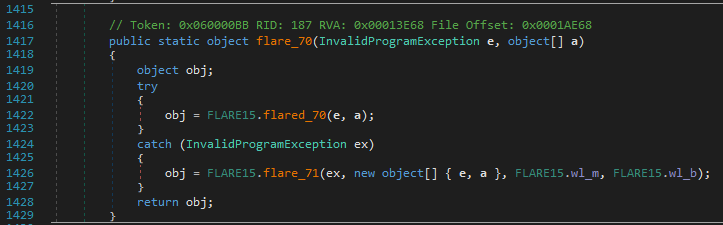
Again, an exception is raised when FLARE15.flared_70() is executed and this time it is handled by FLARE15.flare_71(). Interestingly, the latter also takes two extra parameters: FLARE15.wl_m and FLARE15.wl_b (defined in FLARE15.flare_74()).
This method is not obfuscated and can be easily analyzed once decompiled. Here is what it does.
- Retrieve the metadata token of the function that caused the exception from the stack trace.
- Get the prototype of the function from the metadata token.
- Create a new
DynamicMethodfrom the prototype. - Iterate over the
Dictionarygiven as third parameter (FLARE15.wl_m)- each key is an index in the byte array given as fourth parameter (
FLARE15.wl_b), the latter is actually the bytecode of the dynamic method previously created; - each value is a valid metadata token in the program.
- each key is an index in the byte array given as fourth parameter (
- Each metadata token is translated into a valid token in the scope of the dynamic method. For example, if the token “points” to a string of the program, it is first resolved via
Module.ResolveString()and then a token is created usingDynamicILInfo.GetTokenFor().

- The resulting token is written to the bytecode of the dynamic method at the index specified by the
keyvariable.

- Finally, the patched bytecode is set as the code body of the dynamic method and the latter is executed.

In a nutshell, this method patches the bytecode given as parameter using the provided metadata tokens and invokes it as a dynamic method.
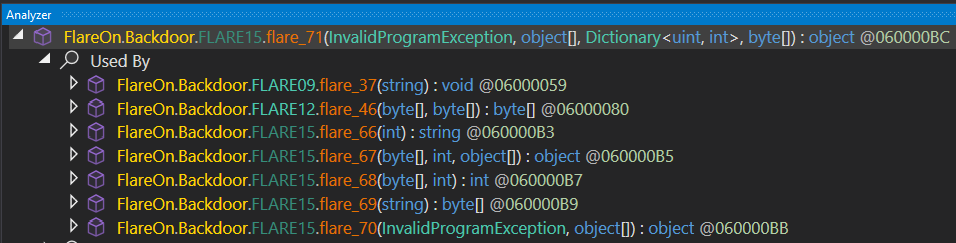
Using the “Analyzer” feature (accessible by right-clicking on method name) of dnSpy, we can identify the locations where FLARE15.flare_71() is called, and thus, the methods obfuscated via this technique.
For each method, the actual bytecode and the metadata tokens can be retrieved from the parameters given to FLARE15.flare_71().
From there, I chose to statically fix the obfuscated methods by the actual executed bytecode, in order to get the decompiled code when the patched executable is loaded into dnSpy.
This is actually quite trivial, just follow the steps below for each obfuscated method.
- Retrieve the real bytecode (i.e
cl_b) and the corresponding metadata tokens (i.ecl_m). - Iterate over each
key/valueof the metadata tokens dictionary, and patch the bytecode at indexkeywith the metadata tokenvalue. - Write the resulting bytecode over the obfuscated method in the executable.
This can be done in a few lines of Python, my script is available on GitHub.
Obviously, this was only a first step as lots of methods remain obfuscated/encrypted (including Program.flared_38()), but we can now statically analyze FLARE15.flared_70() (called when Program.flared_38() raises an exception).
In a nutshell, it decrypts and executes the method that caused the exception. The different steps of this process are detailed below.
- Get metadata token of the method that raised the exception.
FLARE15.flared_66()computes a SHA256 hash of some of the attributes (return type, prototype, etc.) of the method resolved by the token.FLARE15.flared_69()gets the contents of the section whose name starts with the first four bytes (in hexadecimal) of the SHA256 hash previously computed.FLARE15.flared_46()decrypts (RC4) the section contents using the key given as parameter (1278abdfin hexa), the decrypted data corresponds to the actual bytecode of the method.FLARE15.flared_67()decrypts the metadata tokens of the bytecode (XOR with0xa298a6bd) and executes it as a dynamic method (using similar code toflare_71()).
This technique is used to protect all the remaining obfuscated methods of the executable.
Again, I chose to decrypt the obfuscated methods statically.
This time, the algorithm is a bit more complex as FLARE15.flared_67() uses a large hardcoded dictionary to identify the offsets of the bytecode to patch. The most painful part of this step was probably to retrieve the relation between a section name (containing the encrypted bytecode) and the offset of the obfuscated method in the executable.
The Python script I used to patch the second layer of obfuscation is available on GitHub.
Once the obfuscation is defeated, we can finally analyze the actual code of the backdoor, starting with the Program.flared_38() method.
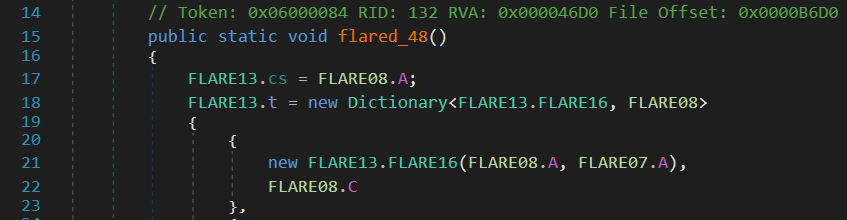
After creating a Mutex (set to e94901cd-77d9-44ca-9e5a-125190bcf317), the method initializes several variables in the FLARE13 module before entering a while loop where the control flow seems to have been flattened.
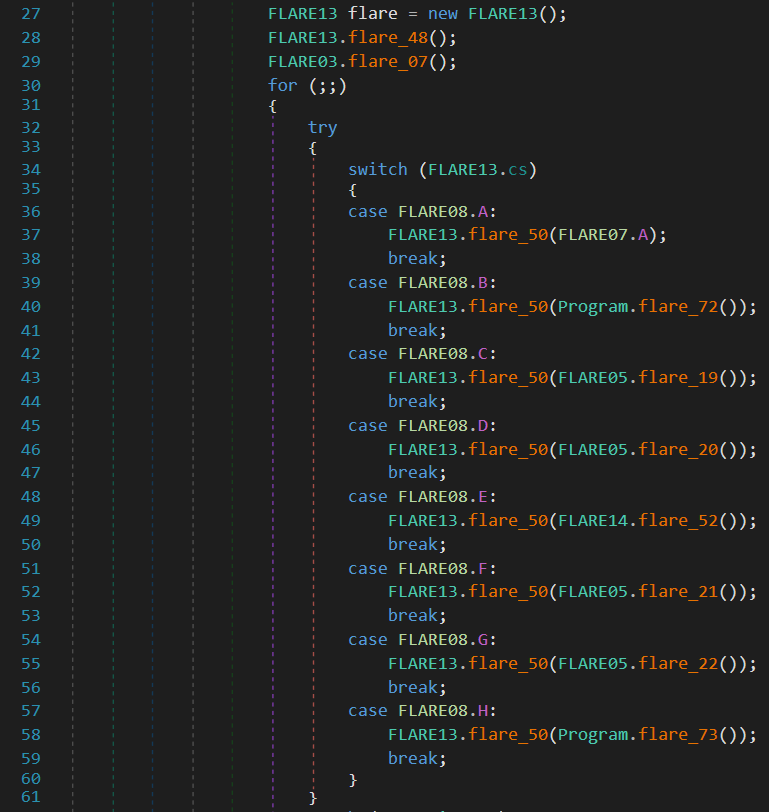
The FLARE13.flare_50() is responsible to update the FLARE13.cs variable which indicates the next method to call. The latter depends on the return value of the method given as parameter as well as on a dictionary (FLARE13.t) initialized by FLARE13.flare_48().
Before entering the while loop, a file named flare.agent.id is created in the same directory as the backdoor. It contains an agent_id (set to - by default) and a counter (set to a random value between 0 and 46656). We will return on these two variables in the next sections.
The first case to be executed is FLARE08.A but it does not call any method, which only sets the next case to FLARE08.C (as shown on the screenshot below). The latter initializes a communication channel with the Command and Control server.
The backdoor communicates with its Command & Control (C&C) server via DNS (only A queries are supported).
Obviously, the domain name of the C&C server is flare-on.com. The payload is encoded using a custom algorithm as a sub-domain.
The method responsible for building the payload is FLARE05.flared_29(). It takes two parameters:
- a payload type (
FLARE06.DomT)); - a string.
Five different payload types are implemented by the backdoor, they are detailed in the following table.
| Payload type | Description |
|---|---|
| FLARE06.DomT.A | Initialize communication with C&C |
| FLARE06.DomT.B | Send result data |
| FLARE06.DomT.C | Ask for task data |
| FLARE06.DomT.D | Ask for next task |
| FLARE06.DomT.E | Ask for task |
The following sequence diagram sums up how the different payloads are used by the backdoor.
sequenceDiagram
	participant Backdoor
	participant C2
	Backdoor->>C2: DomT.A (HELLO)
	C2->>Backdoor: Answer (NEW AGENT_ID)
	Backdoor->>C2: DomT.E (REQUEST TASK)
	C2->>Backdoor: Answer (TASK SIZE)
	loop GET_TASK_DATA
		Backdoor->>C2: DomT.C (REQUEST TASK DATA)
		C2->>Backdoor: Answer (TASK DATA)
	end
	loop SEND_TASK_RESULT
		Backdoor->>C2: DomT.B (TASK RESULT DATA)
		C2->>Backdoor: Answer (NEXT TASK SIZE)
	end
	Backdoor->>C2: DomT.D (REQUEST NEXT TASK DATA)
	C2->>Backdoor: Answer (TASK DATA)
Payload data is encoded using a substitution alphabet built from the counter. More precisely, the alphabet is randomly generated using a Mersenne-Twister seeded with the counter. The latter is incremented by one after each request to the C&C server.
As the value of the counter is also randomly generated, it is encoded using another substitution alphabet (hardcoded this time) and sent to the C&C server.
Once the backdoor has finished to received task data, it calls the method FLARE07.flared_56() to process the task.
The first byte of task data corresponds to the task type (defined in FLARE06.TT). Depending on the latter, the rest of the task data can be decompressed before being interpreted.
| Type | Is compressed | Description |
|---|---|---|
FLARE06.TT.A |
N/A | Not implemented |
FLARE06.TT.B |
Yes | Execute a command |
FLARE06.TT.C |
No | Execute a command |
FLARE06.TT.D |
No | Write :) to the given file path |
FLARE06.TT.E |
Yes | Write :) to the given file path |
Various commands are supported by the backdoor, and most of them are base64-encoded.
Once decoded, the command shown on the screenshot above corresponds to:
$(ping -n 1 10.65.45.3 | findstr /i ttl) -eq $null;$(ping -n 1 10.65.4.52 | findstr /i ttl) -eq $null;$(ping -n 1 10.65.31.155 | findstr /i ttl) -eq $null;$(ping -n 1 flare-on.com | findstr /i ttl) -eq $null
Interestingly, most of the commands append a short string to a global variable (FLARE14.h) when they are executed. Two other methods also use this global variable.
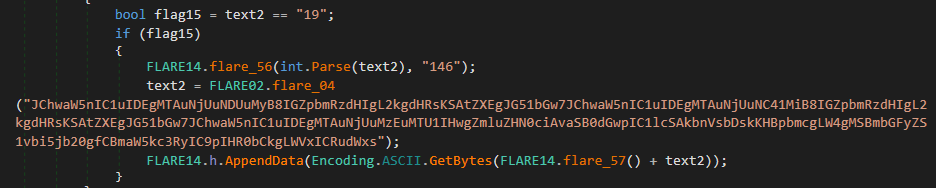
FLARE11.flared_42()initializes the Mersenne-Twister algorithm but also the variableFLARE14.has anIncrementalHashobject (only once).IncrementalHashprovides support for computing hashes incrementally across several segments. In our case segments are the short strings appended by the commands of the backdoor.

FLARE14.flared_54()reversesFLARE14.shto obtain a section name, computes the hash to get a RC4 key and uses it to decrypt the section data. Then it decrypts the hash with a hardcoded RC4 key to get a filename, and writes the decrypted section data to this file. Finally, the latter is executed/started as a new process.
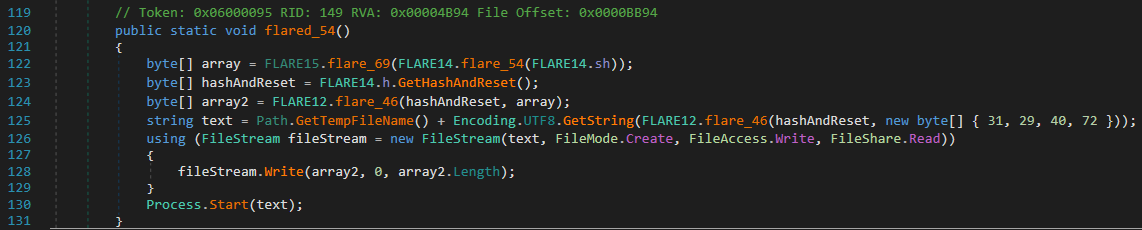
At this point, we understand that we have to execute commands in a particular order by the backdoor to decrypt and execute the next (and maybe final) stage.
To determine the order in which the commands have to be executed, we need to understand how FLARE14.sh is built. The method responsible for updating this variable is flared_55().
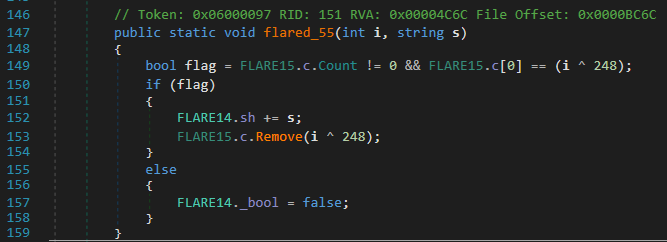
This method takes the command identifier and the short string corresponding to the command as parameters. It checks if the first item of FLARE15.c corresponds to the command identifier XORed with 248. If it is the case, the short string is appended to FLARE14.sh and the item that matched in FLARE15.c is removed. Thus this array gives us the order in which the commands have to be executed.

I chose to implement my own C&C server to execute the different commands. The code is available on GitHub.
After executing all the commands, a GIF file is finally decrypted by the backdoor.
You're really crushing it to get this far. This is probably the end for you. Better luck next year!
Two files are given for this challenge: a PE executable and what seems to be an encrypted file.
$ file flareon.exe SuspiciousFile.txt.Encrypted
flareon.exe:                  PE32+ executable (console) x86-64 (stripped to external PDB), for MS Windows
SuspiciousFile.txt.Encrypted: data
When executed, the binary waits for a command line parameter: a valid filename ending with .EncryptMe.
PS C:\Users\User\Desktop> .\flareon.exe
usage: flareon path [path ...]
PS C:\Users\User\Desktop> .\flareon.exe .\Test.txt.EncryptMe
.\Test.txt.EncryptMe
1 File(s) Encrypted
After the execution, two files are created:
Test.txt.Encryptedcorresponding to the encrypted version of our input file;HOW_TO_DECRYPT.txtis the ransomware note (see the contents below).
~*~*~* The FLARE-ON Encryptor ~*~*~*

All your files have been encrypted with a powerful combination of
symmetric and asymmetric cryptography. Do not tamper with the encrypted files.
It is of no use and will only risk corrupting your data.

To get your files decrypted send lots of cryptocurrency over Tor.

You'll need to copy and paste us these values to get your key.

<9f18776bd3e78835b5ea24259706d89cbe7b5a79010afb524609efada04d0d71170a83c853525888c942e0dd1988251dfdb3cd85e95ce22a5712fb5e235dc5b6ffa3316b54166c55dd842101b1d77a41fdcc08a43019c218a8f8274e8164be2e857680c2b11554b8d593c2f13af2704e85847f80a1fc01b9906e22baba2f82a1,
d9a288e5743484a7dc040d14b3e04ca6f6967656c085f8a9c53aab7bfb0f6beee7e101ba27a900f340754daf701b0964d479bc55f49a1c871e04c6da3dc3e6ee857116004f3eeb00866c45e48eb202535de5dc4716a54c39835d20dbdf2c9da56af8f9edbdd8786a5e507e4215c097be075ef4601f67071685461fdbd22926c1,
368f92b2e96b2a212a32984d3adee85d1e9e90cab6602c44377a47541b4b89f9e13cc353612d8cba9319794f06dcc4b4371c9730143b867b937845b709b729dcb62fe5f5fc36cd22616291c3d6fac2189c5ff4e525aebf85041fccbd068b7f5c39dea6d72fd31a21d033d0f4e7e4b2fe156e565a0d0331f85792acc0eaa9394a>
The goal of the challenge is to analyze the executable in order to decrypt SuspiciousFile.txt.Encrypted.
After opening the executable in our favorite disassembler, we can see there is no obfuscation at all and the code seems to be easy to read. Here is what it does.
- Resolve the
RtlGenRandomWindows API. - Call a function (at
0x4021D0) to initialize some large buffers (we will come back to this one in the next section). - Open the file given as command line parameter.
- Generate a random encryption key (via
RtlGenRandom()). - Encrypt the file contents using the random key. According to a constant of the encryption algorithm and a bit of dynamic analysis, the algorithm seems to be ChaCha20.
- Use several buffers initialized at step 2 to (maybe?) encrypt the ChaCha20 key.
- Write some of these large buffers and the result of the previous step after the encrypted file contents.
The ransomware note gives us a hint regarding the purpose of this function, as files “have been encrypted with a powerful combination of symmetric and asymmetric cryptography”. We already know that ChaCha20 is used and the latter is a symmetric algorithm so this function is likely an implementation of an asymmetric algorithm.
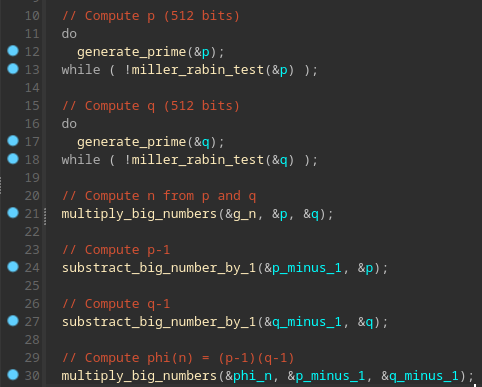
Without a surprise, the first that came to my mind is RSA (see here for a quick remainder on the algorithm). This cryptography algorithm is based on modular exponentiation and can use several key sizes, the most popular are 1024, 2048 and 4096 bits. Thus, the first thing I did is looking at the size of the buffers processed by our mystery function.
At first, two random buffers of 64 bytes (or 512 bits) are generated using RtlGenRandom(). Several checks are done on these buffers (especially by the function at 0x401DF2) and if the checks are not verfied, new buffers are randomly generated, and so on.
If we compare this with RSA, the initialization of RSA 1024-bit also requires two numbers of 512 bits (p and q). Both numbers have to be prime numbers, this property can be verified using a primality test. Looking more closely at the function doing the checks (at 0x401DF2), we understand this is actually an implementation of the Miller-Rabin primality test.
At this point, RSA 1024-bit seems to be a good candidate for our mystery function, but we have to confirm this hypothesis by looking at how the two 512-bit prime numbers are processed next.
After a bit of static analysis, here is what my IDA decompilation output looks like and this confirms our hypothesis.
Finally, the RSA private key is generated from phi(n) and the exponent e = 0x10001.
If we go back to the step where the ChaCha20 encryption key is (maybe?) encrypted using RSA, we understand that the modular exponentiation is done using the private key d instead of the public exponent e. In other words, the ChaCha20 key is only signed but not encrypted.
As the signed ChaCha20 key as well as the modulus n are written at the end of the encrypted file, we can easily retrieve the ChaCha20 key by doing the modular exponentiation of the signed ChaCha20 key using the public exponent e and the modulus n.
There were several ways to perform this, I chose to use miasm to emulate the modular exponentiation function. My script is available on GitHub.
After running the script, we get the following result.
$ python decrypt_file.py flareon.exe SuspiciousFile.txt.Encrypted
[...]
Hello!

The flag is:

R$A_$16n1n6_15_0pp0$17e_0f_3ncryp710n@flare-on.com
This challenge is a Macintosh disk image (Disk Copy 4.2 format, for those who need to know) containing a 68K Macintosh program. You must determine the passphrase used to decode the flag contained within the application. Super ResEdit, an augmented version of Apple's ResEdit resource editor which adds a disassembler, is also included on the disk image to help you complete the challenge, though you will likely also need to do some outside research to guess the passphrase.

This application can be run on any Macintosh emulator (or any real Macintosh from as far back as a Mac Plus running System 6.0.x up to a G5 running Classic). The setup of the emulation environment is part of the challenge, so few spoilers live here, but if you want to save yourself some headaches, Mini vMac is a pretty good choice that doesn't take much effort to get up and running compared to some other options.

This application was written on a Power Macintosh 7300 using CodeWarrior Pro 5, ResEdit, and Resourcerer (my old setup from roughly 1997, still alive!). It was tested on a great many machines and emulators, and validated to run well on Mac OS from 6.0.8 through 10.4.

Happy solving! Be curious!
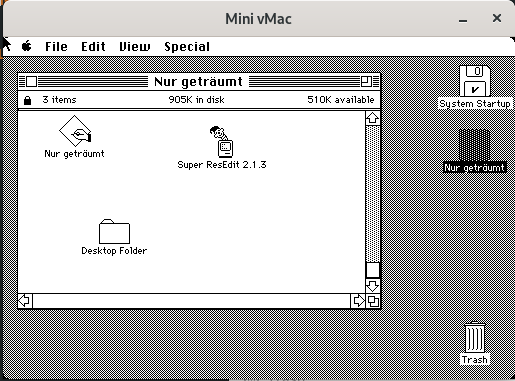
As mentioned in the description, this challenge is a Apple DiskCopy image. A README.txt is also provided but it is only a copy of the challenge description above.
$ file Nur\ geträumt.img
Nur geträumt.img: Apple DiskCopy 4.2 image Nur getr\212umt, 1474560 bytes, MFM CAV dshd (1440k), 0x2 format
As this is a disk image, the first thing I did was mounting it. For that purpose, I used a tool named Convert2Dsk that converts DiskCopy 4.2 images into raw disk images (HFS image in my case). Then, I used the hfsutils tools to interact with the HFS image.
$ file Nur\ geträumt.img.dsk
Nur geträumt.img.dsk: Macintosh HFS data block size: 512, number of blocks: 2874, volume name: Nur getr\212umt
$ hmount Nur\ geträumt.img.dsk
Volume name is "Nur getrumt"
Volume was created on Fri Jul 29 10:54:35 2022
Volume was last modified on Wed Oct 19 22:05:58 2022
Volume has 522240 bytes free
$ hls
Desktop Folder       Nur getr?umt         Super ResEdit 2.1.3
The hcopy tool can be used to extract the application to analyze.
$ hcopy "Nur getr?umt" .
$ file Nur_getr\X8aumt.bin
Nur_getrumt.bin: MacBinary II, inited, Sun Jan 16 03:32:01 2022, modified Thu Sep 15 18:10:54 2022, creator 'Nena', type application "Nur getr\212umt", at 0x80 6420 bytes resource  Apple HFS/HFS+ resource fork
According to the specification of MacBinary II, the format is composed of a 128 bytes header followed by forks. In our case, there is only a resource fork corresponding to the 68k program we have to analyze. We can extract it using the following command line.
$ dd if=Nur_getr\X8aumt.bin of=resource.bin bs=1 skip=128 count=6420
Once we have the resource, we can load it and disassemble it in IDA using the IDC scripts from this project.
Interestingly, the name of the creator indicated in the binary header (Nena) and the hardcoded string (99 Luftballons) seem to be a reference to a song named 99 Luftballons from the German band Nena.
We can identify the main() function of the program at the offset 0x13C0 and start to analyze it. I quickly spotted a XOR loop (in the decodeFlag() function) that seems to decrypt the flag from an encrypted data resource but I had some difficulties to retrieve the XOR key.
At this point, I switched to dynamic analysis to get a better understanding of what the application actually does.
As mentioned in the challenge description, we can use Mini vMac to setup an emulation environment.
Double-clicking on the application opens the following dialog.
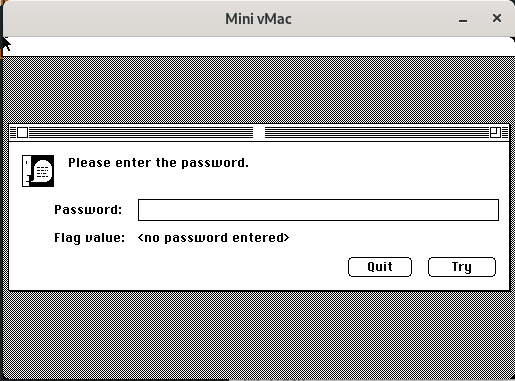
If we enter a dummy password, the flag value is modified accordingly.
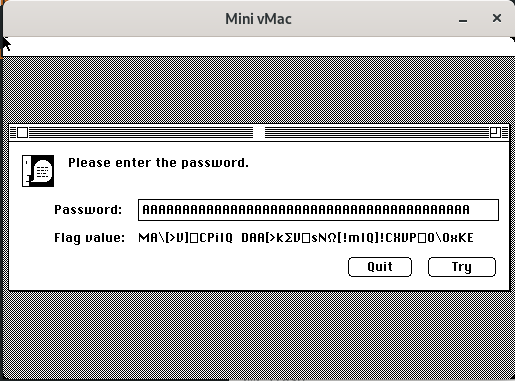
This test indicates us that the password is the XOR key as XORing the input with the resulting flag returns the encrypted flag resource.
As we partially know what the flag looks like (ends with @flare-on.com), we can partially retrieve the XOR key. Indeed, if we XOR the end of the encrypted flag resource with @flare-on.com, we get du etwas Zei which looks like german words.
My skills in german are near zero, however searching for these words on Google and linking this with the previous hint we had on the song from the german band Nena, allowed me to identify the same words in the lyrics of this song: “Hast du etwas Zeit für mich?”.
Using this sentence as the XOR key gives us the flag Dann_singe_ich_ein_Lied_fur_dich@flare-on.com.
Protection, Obfuscation, Restrictions... Oh my!!

The good part about this one is that if you fail to solve it I don't need to ship you a prize.
The last challenge is a Python application bundled in a PE executable using PyInstaller.
$ file 11.exe
11.exe: PE32+ executable (console) x86-64, for MS Windows
I used pyinstxtractor to extract the Python scripts.
Two extracted files are particularly interesting:
11.pycis the compiled Python script we have to analyze;pytransform.pydis a module that is part of the PyArmor obfuscator.
After using uncompyle6 to decompile 11.pyc, we get the following Python script.
from pytransform import pyarmor
pyarmor(__name__, __file__, b'PYARMOR\x00\x00\x03\x07\x00B\r\r\n\t0\xe0\x02\x01\x00\x00\x00\x01\x00\x00\x00@\x00\x00\x00a\x02\x00\x00\x0b\x00\x00x\xa7\xf5\x80\x15\x8c\x1f\x90\xbb\x16Xu\x86\x9d\xbb\xbd\x8d\x00\x00\x00\x00\x00\x00\x00\x0054$\xf1\xeb,\nY\xa9\x9b\xa5\xb3\xba\xdc\xd97\xba\x13\x0b\x89 \xd2\x14\xa7\xccH0\x9b)\xd4\x0f\xfb\xe4`\xbd\xcf\xa28\xfc\xf1\x08\x87w\x1a\xfb%+\xc1\xbe\x8b\xc0]8h\x1f\x88\xa6CB>*\xdd\xf6\xec\xf5\xe30\xf9\x856\xfa\xd9P\xc8C\xc1\xbdm\xca&\x81\xa9\xfb\x07HE\x1b\x00\x9e\x00a\x0c\xf2\xd0\x87\x0c<\xf8\xddZf\xf1,\x84\xce\r\x14*s\x11\x82\x88\x8d\xa7\x00k\xd9s\xae\xd3\xfc\x16v\x0f\xb9\xd1\xd3\xd02\xecQ\x9a\xd7aL\xdf\xc1~u\xca\x8a\xd4xk\xde\x030;\xb2Q\xc8$\xddQ\xd3Jj\xd1U\xccV\xd1\x03\xa9\xbf\x9f\xed\xe68n\xac&\xd67\x0c\xfd\xc6^\x0e\xb40\x07\x97|\xab\xadBc<T\x0b d$\x94\xf9\x90Oq\x027\xe4\xf2\xec\xc9\xbc\xfaL7dN\x83\x96X\xab\xf7\x18\xad\xfc\xf7\x992\x87\x1d\xe8p\x97C\xd4D.\x1b;F_ \x91t\tM\x155\x0c\xb9\x9f\xd0W C\x19oz4.\x998\xe7\xa9\x98\xd4\xd2\x9f\x95H\x91\xf2`\x1c\xfa\xa4,\xa9d?day\xc4\xf3\xcb\xc8r\xf7\x97\xd1u\xfe\xec\x91\xc1\xe6V\xa3j\x0f\xb9\xd5\xa1a\xd5\x17\x8b!\xc4{A\xb2t\x85\xfe\x88\xffaO\x05\xc5\xacg\xed;]\xb9\xdd\x7fS\xef\xe4F\xf9"\x0c\xd9\x1a\xb6\x88-Y \xdd\xea\xc9\xf1>:\xbf][\xdf[\x07\xb9\xe2@\xeeq\xf9Ho\xc3\xc4sD\xcd\xcc\x8a\x11tq\xf6;\xe9\x84\x7fb\xe9\xf4t\x80\xe4l)_\xeaQ\x10\x8f^-\xc5\x11\xe7\x84x\xe7-\xb2\x15[5\xb0\xdck\x1awh\r;\x9by\x14\x1a\xe0:\xbd\x904\xa2\xfap[\xe0\x9fn3\x7fk;3n\xf8\xe3%\xc6t\xbf|\x12\x9a\x1b\xe2\xf1C\x10\xbe\xee\xe7.\x98>k\xb9r\xf9\x9cN8\xae\xc0\x8bA\x0f\xbb\x8d\xf4\x04\xb0\x01,\x05\xaa\xc5\r\xce\x91\'\x98\xc6\xd3Y\x1b\xd1U\xd3\xd7d|{I\x18JG\xa63\xd6\'r\xcf!7\x17qd\xb7|\x1f\x7f\x17\xb4\xa8\xb9\xa8\xdaz\x02g\xc7+]F\x10\x18l\x0c\x91g\xd0e\x1f\xe4\xa67\xb2\xba\x9f\xef\xba\xc7[3_\x12C\xe9\xf4s\x87q\xa3\xec\xa0\xcc\x06\xf4\x9f\xe1\xb3\xe6R\x93\xf2\xd57i\xf8\x96\xb3x\xa7uEw\x12D\x8c\xc6XkdfY\xe0J2N\xbf\x85o\x8e\x81|C\xa91#y\xd9u\xf1\xd1BC\xcc}\xe8;?\x12S\x16', 2)
Before this challenge, I was not familiar with PyArmor, so the first thing I did was looking for documentation on that obfuscator. Surprisingly, the official documentation of the project is quite complete.
The following picture, taken from PyArmor official website, illustrates how the obfuscator works.
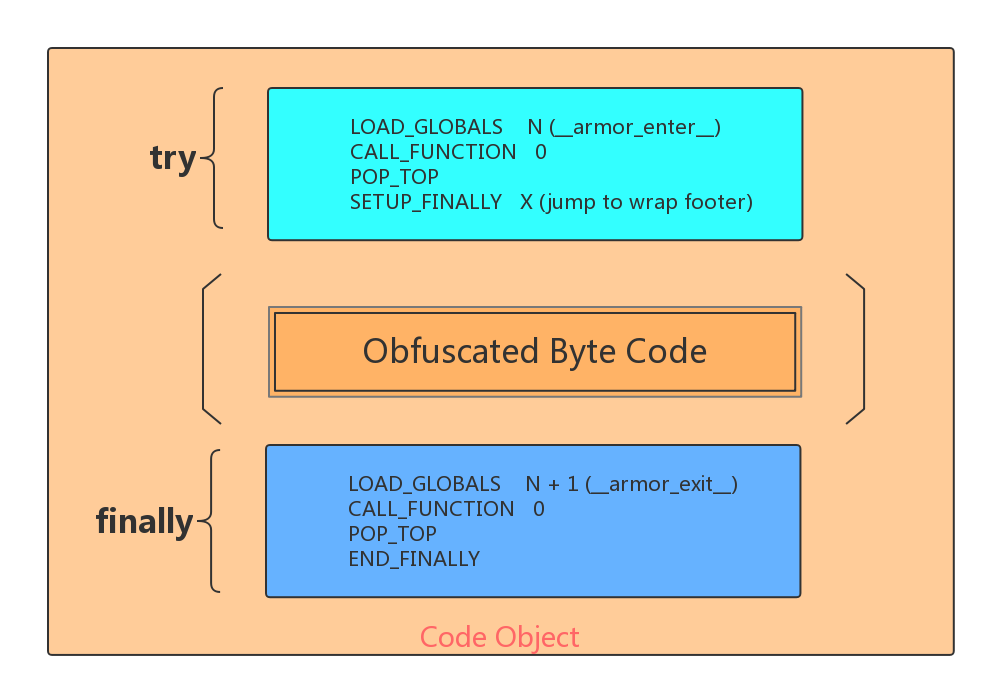
Obfuscated code objects are wrapped between a header (__armor_enter__) and a footer (__armor_exit__). The former is responsible for restoring the original bytecode and the latter obfuscate the bytecode again after its execution.
PyArmor supports differents modes (Super Mode, Super Plus Mode, VM Mode, etc.) for obfuscating scripts. In our case, as there is no Bootstrap code at the beginning of the script, we can assert that at least the Super Mode was used. Besides the fourth parameter given to the pyarmor() function means that the obfuscating module mode was set to 2 (stronger cryptography algorithm).
At this point, I switched to the analysis of the pytransform module in order to understand how the code object was obfuscated.
After loading the module in IDA, we can see there are only a few export functions. I started with PyInit_pytransform() as this is the function called when the module is imported in the Python script.
The function creates a new callable PyObject named __armor_wrap__ using PyCFunction_NewEx(). Then, it initializes several ciphers, installs some anti-debug mechanisms (at 0x6D654420) and verifies the PyArmor license.
What is interesting here is the __armor_wrap__ function (handled at 0x6D604BC0). Indeed, instead of using the functions __armor_enter__ and __armor_exit__, it seems that the mode used to obfuscate this script calls __armor_wrap__. At the time of the challenge, the latter was not really documented so I continued my analysis on this function.
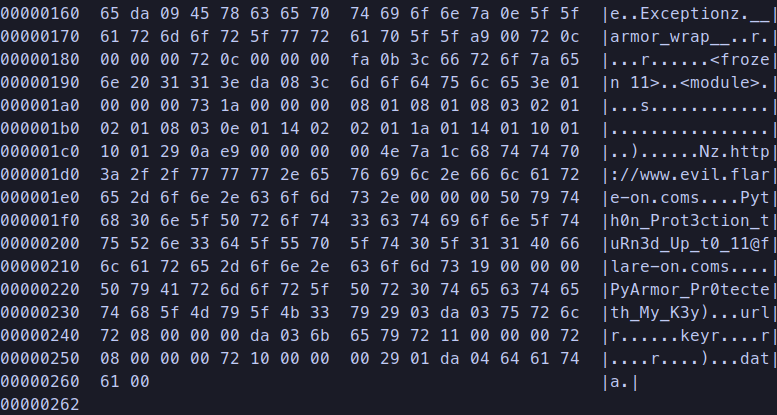
The bytecode is decrypted using AES-256 in CTR mode and executed by a (very) big function at 0x6D67A640 (see the CFG below).

From here, there are likely several solutions to continue this challenge but I chose the lazy one: using a debugger and breaking before the execution of the bytecode to extract it.
In order to debug the script, there are two requirements:
- patching the anti-debug mechanisms (
NOPis your friend); - bypassing the Restrict Mode.
I discovered the latter when I was trying to attach my debugger to the Python process. As the mode 2 was used, I could not import the obfuscated script from a plain script without a “protection exception” being raised. However, this security measure can be patched as well.
Once these requirements are met, it is trivial to break before the bytecode execution and dump the decrypted code object.
As the flag was only a constant of the code object, the challenge was already over, but I still wanted to get a clean decompiled code. However, when I understood that the opcodes were remapped in the pytransform module, I changed my mind :)