Flare-On 10 solutions
I once again participated in the Flare-On challenge organized by the FLARE team.
This year, there was a total of 13 challenges to solve, which is more than previous years and the difficulty was significantly higher as well. Apart from classic Windows C/C++ executables, this year’s contest featured a Rust challenge, a Android application, a hard disk image compromised with a ransomware and even a PDP-11 challenge.
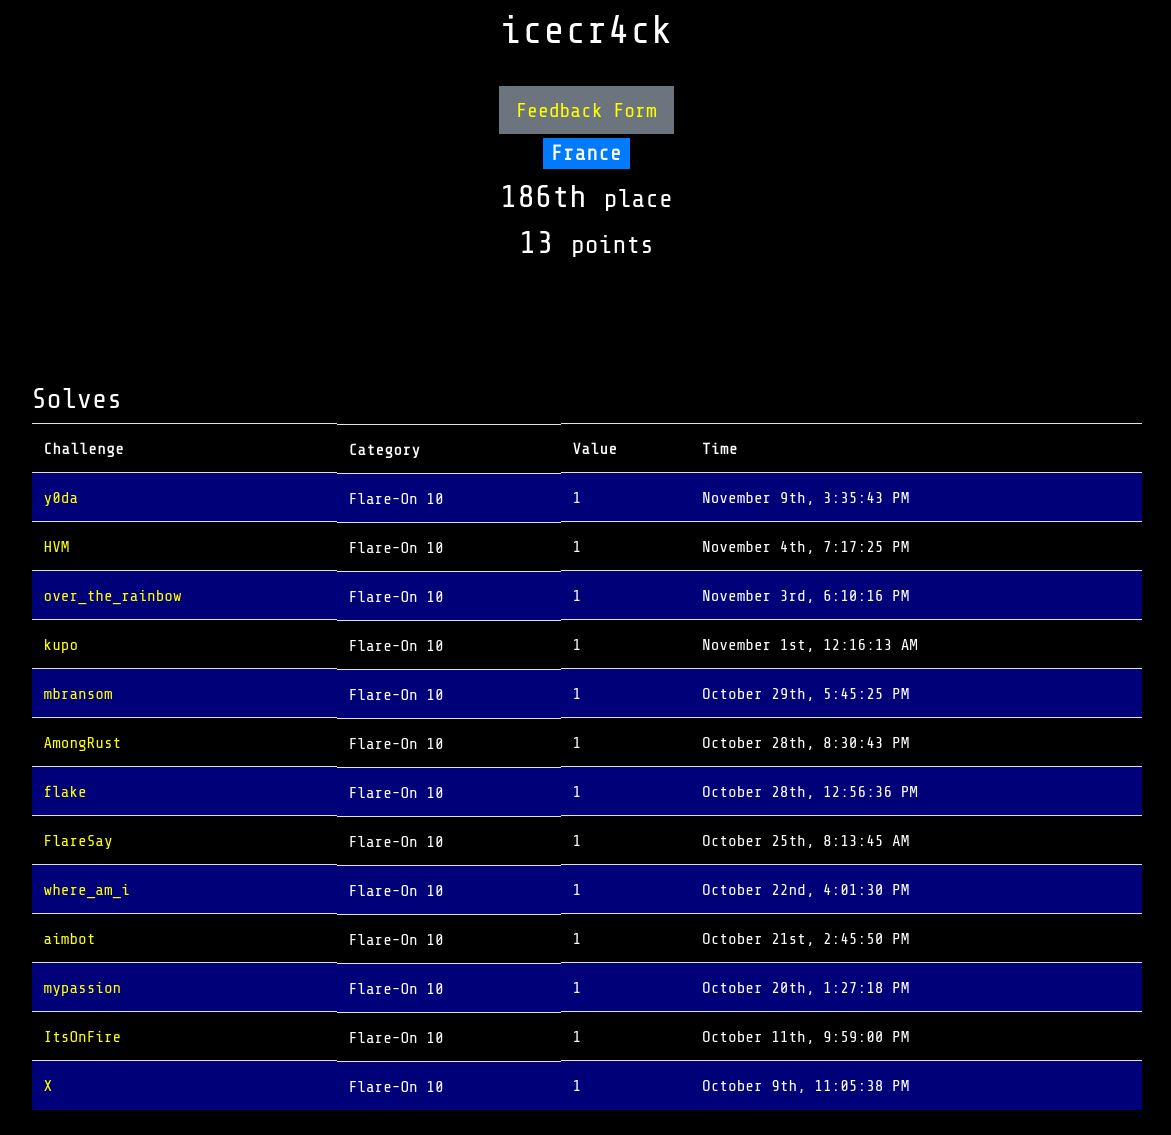
To avoid writing a post longer than last year, I only wrote solutions for the challenges I liked and learned the most from. Solutions from the challenge authors are available on Mandiant’s blog.
Thanks to the FLARE team for the hard work, I hope this challenge will continue to live on.
You’re doing great champ! This challenge is a modern (and retro) take on the classic game Simon Says. The cool thing about this one though is it will make you give up, and maybe take that sales job after all. It’s better for everybody that way.
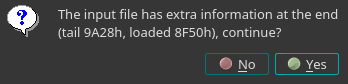
This challenge was quite interesting as it appears to be a DOS executable at first glance (output of file command), but actually this is also a valid PE executable. This gives two different execution flows but both are necessary to get the flag.
For this first part, we have to specify IDA to load it as a MS-DOS executable and not a PE. Interestingly, IDA is able to detect an overlay corresponding to the PE header.
Once IDA finished its analysis, we get to the following function corresponding to the entry point.
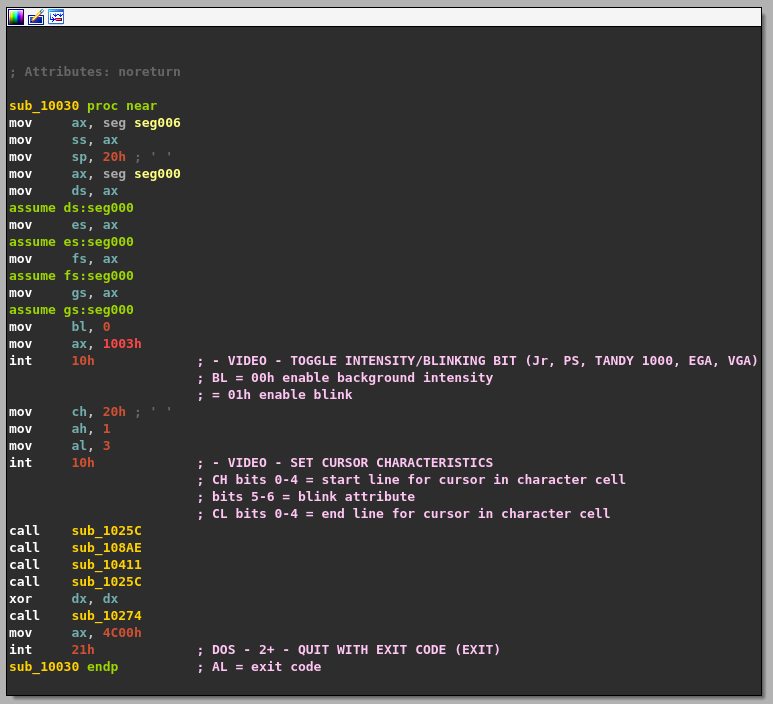
Two software interrupts are frequently used in this program, int 10h and int 21h. The former provides video services (setting video mode, reading and writing pixels, etc.) and the latter is known as the DOS API. It exposes a lot of basic functions to the developer such as creating a file, allocating memory, and so on. I found this website quite useful to have a reference of the available functions.
At this point, in order to have a better idea of the game graphics, I emulated it using DOXBox. This emulator even has a built-in debugger which helps a lot to get a memory view of the game at any point in the execution. After a nice intro music and a colored splash screen, we finally get to the game.
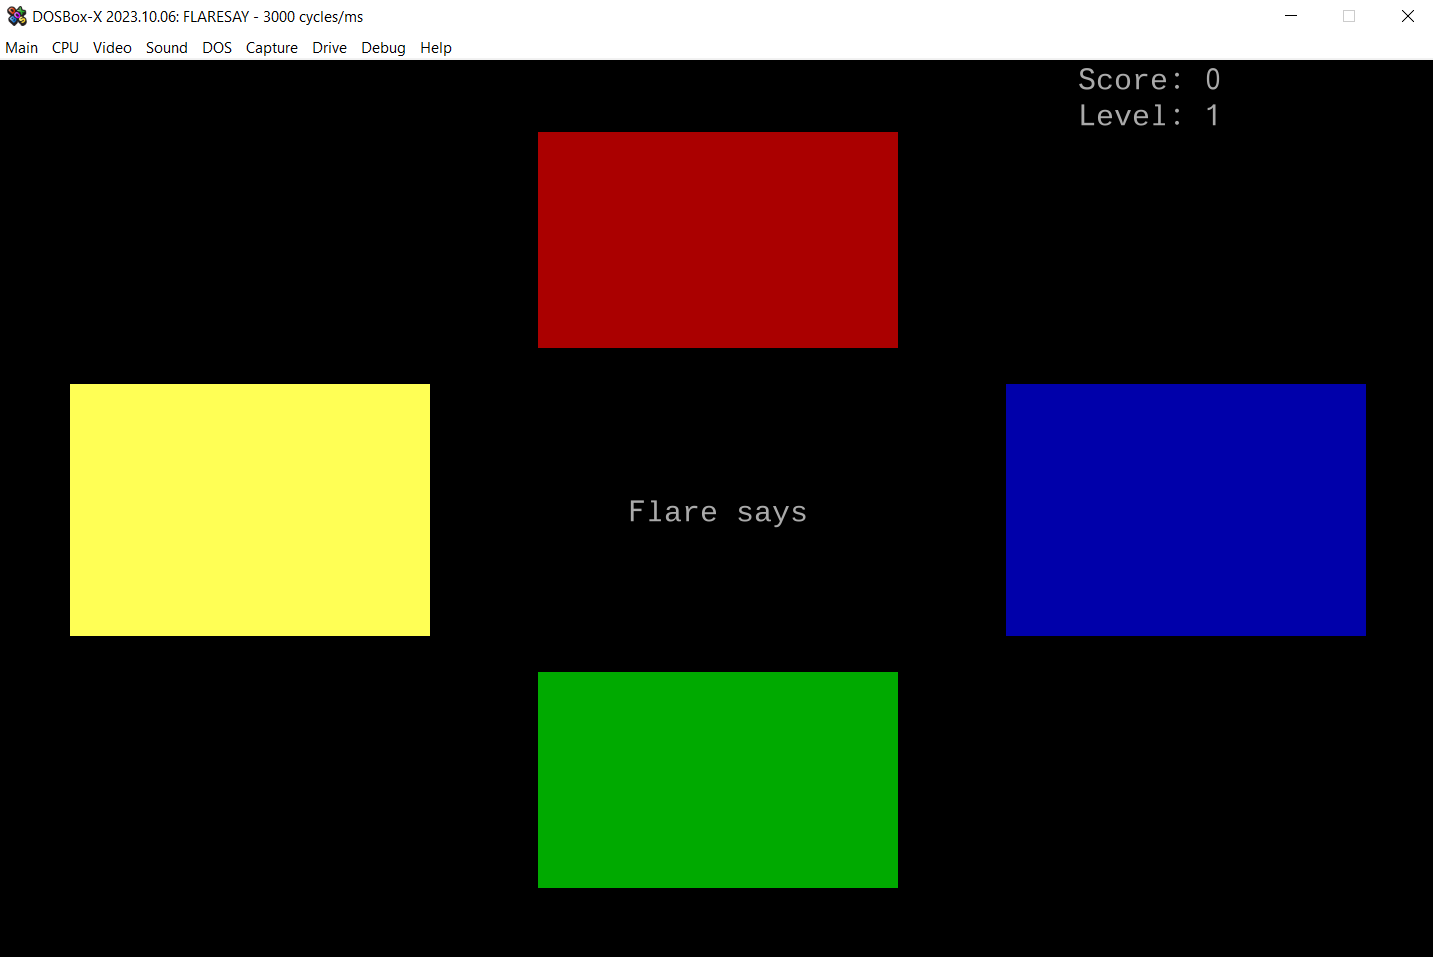
The goal of the game is to repeat the highlighted square sequence using keyboard keys. At first, the sequence is only a single square but it increments by one at each win.
Back to static analysis, there is an interesting function at 0x108C3 that checks if a specific sequence of keys have been pressed on while the game is loading. The expected sequence is Up-Up-Down-Down-Left-Right-Left-Right-b-a, a well known cheat code named the Konami Code. If it is correctly entered, the screen blinks once and a checksum of the sequence key codes is computed and set at a specific location in memory.
By looking at the cross-references of this memory location, it appears that it is used as a state value in a function that generates pseudo-random numbers. The latter is responsible for defining the sequence of squares that the user has to repeat. Here is a Python implementation of this algorithm.
def rand(min, max):
  return (0x5a7f * state + 0x3079) % (max - min)
The game ends when the user has successfully won 128 times in a row. Then, the program patches the executable on the disk by overwriting 16 bytes at offset 0x8E85. The source data used for patching is progressively built by the function at 0x1017E while the user keeps winning. Obviously, those 16 bytes are very dependent on the initial state of the random function but we can safely assume that the challenge author expects us to use the one generated when the Konami code is entered.
From there, several solutions are possible, such as statically reconstructring the algorithm of the function at 0x1017E to get patch data or modify the game to win without user input (likely the easiest). For my part, I chose to use miasm to emulate the pseudo-random function and the function producing patch data. The script is quite simple and available here.
Once the patch is applied on the executable, we can move to the PE part of the challenge.
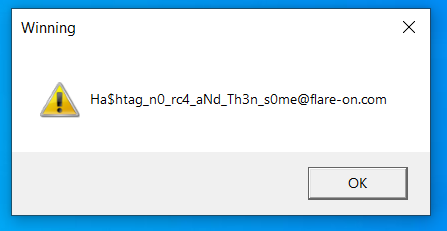
At the entry point, a 32-bit checksum of our patched data is computed and compared with 0x31D9F5FF. If it matches, the same data is used as a RC4 key to decrypt 84 bytes at 0x408EA0. Finally, the decrypted data is printed to the user in a message box.
You’re doing so great! Go out and celebrate. Take a day off kid, you’ve earned it. Watch your scoreboard position fall like the sand through the hourglass. Avoid this VM and feel the joy the outside world has to offer. Or crush this one and earn even more internet points, those will come in handy.
For this challenge, we have a raw disk image named hda.img to analyze.
$ file hda.img
hda.img: DOS/MBR boot sector; partition 1 : ID=0x6, active, start-CHS (0x0,1,1), end-CHS (0x3ff,15,63), startsector 63, 1032129 sectors
In order to analyze a Master Boot Record (MBR), we need some tooling. In my opinion, the combination of IDA with the Bochs emulator is a good solution. Hex-Rays even provides an archive containing all the necessary files to setup our lab. The archive comes with a blog post written in 2007 but still relevant.
In this case, only a single file file from Hex-Rays archive is required: bochsrc. The latter needs to be edited to match the disk image filename and eventually the disk geometry.
romimage: file=$BXSHARE/BIOS-bochs-latest
vgaromimage: file=$BXSHARE/VGABIOS-lgpl-latest
megs: 16
ata0: enabled=1, ioaddr1=0x1f0, ioaddr2=0x3f0, irq=14
ata0-master: type=disk, path="hda.img", mode=flat, cylinders=20, heads=16, spt=63
boot: disk
Once the bochsrc file has been correctly edited, we can test it with the Bochs emulator using the following command line.
"C:\Program Files\Bochs-2.7\bochsdbg.exe" -f bochsrc -q
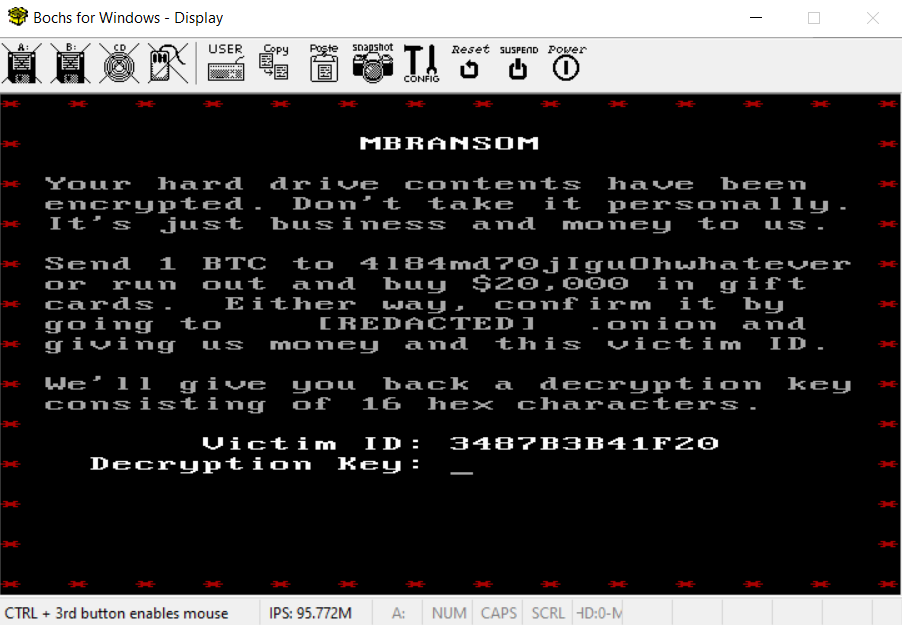
The video output clearly indicates we are dealing with a ransomware here.
Afterwards, we can open bochsrc in IDA and start analyzing and debugging the MBR.
The MBR starts with remapping itself from 0x7C00 to 0x600, and jumps at 0x61D. Then, it iterates over the partition table entries until it finds an active partition that has an attribute whose LSB is set to 1. As the latter is non documented, it likely means the partition is encrypted (confirmed in Mandiant’s write-up).
Afterwards, it gets the number of sectors for the first track using the interrupt 13,8 and maps the sectors at 0x1000 using the interrupt 13,2.
The sectors are then decrypted using RC4 with the key Obfuscation12345 and the program continues at 0x1000. This decryption process can be easily bypassed by setting a breakpoint before the jump in IDA Bochs debugger.
The first track contains the ransomware bootstrap code responsible for decrypting the disk if the correct decryption key is entered. As specified in the ransomware message, the key consists of 16 hexadecimal characters.
The function checking the decryption key can be found by looking for the interrupt 16,0 that reads a character. Once the 16 hexadecimal characters are read, the key is verified in function at 0x1296.
The first check performed by the function consists to XOR each byte of the victim identifier (3487B3B41F20) with a byte of decryption key and check if the result is equal to 0x55. This immediately gives the first twelve characters of the key: 61D2E6E14A75.
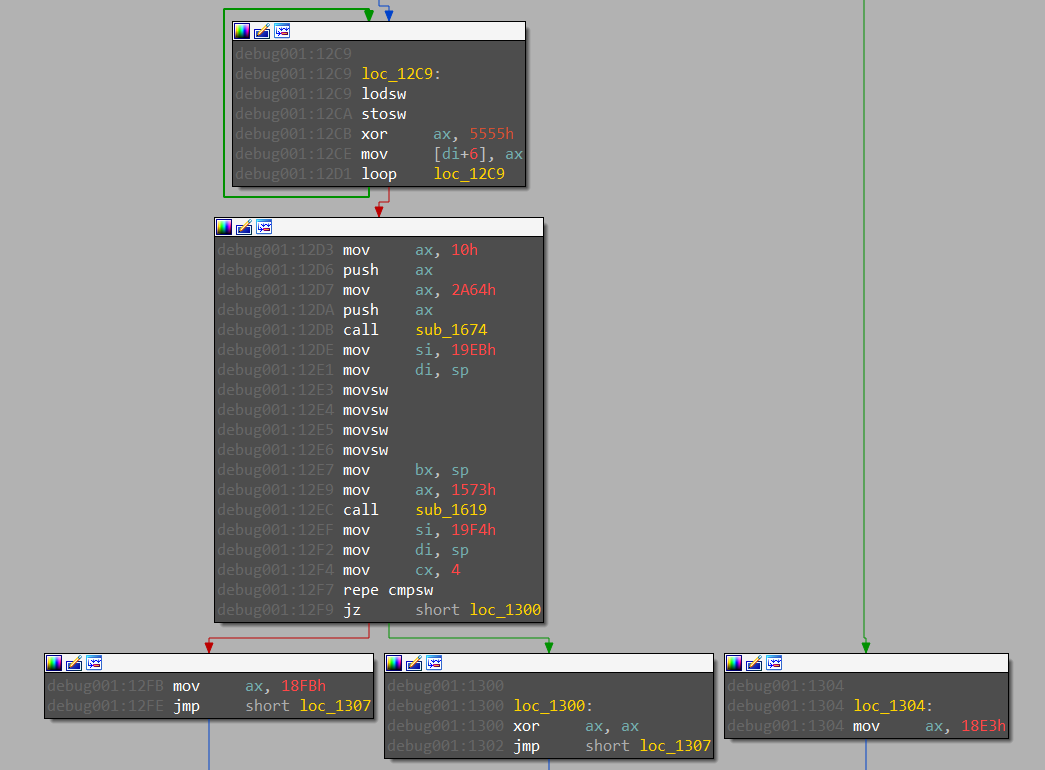
The second check seems much more complicated as it depends on two other functions (see screenshot below) however it is not necessary to analyze it to get the full key. As shown on the disassembly below, the key is valid if the function returns 0, otherwise it returns the adress pointing to an error message (either at 0x18FB or at 0x18E3). Thus, it is possible to use this information as a stop condition to brute-force the last four hexadecimal characters of the key.
As there are not a lot of candidates to test (only 65536), performance is not really an issue in this case. I used miasm to emulate the function at 0x1296 (previously dumped from IDA Bochs debugger). The script is very simple and can be found here.
After a few minutes, we get the full decryption key: 61D2E6E14A754ADC.
Once the decryption process is over, we get access to the disk files, including the one containing the flag.
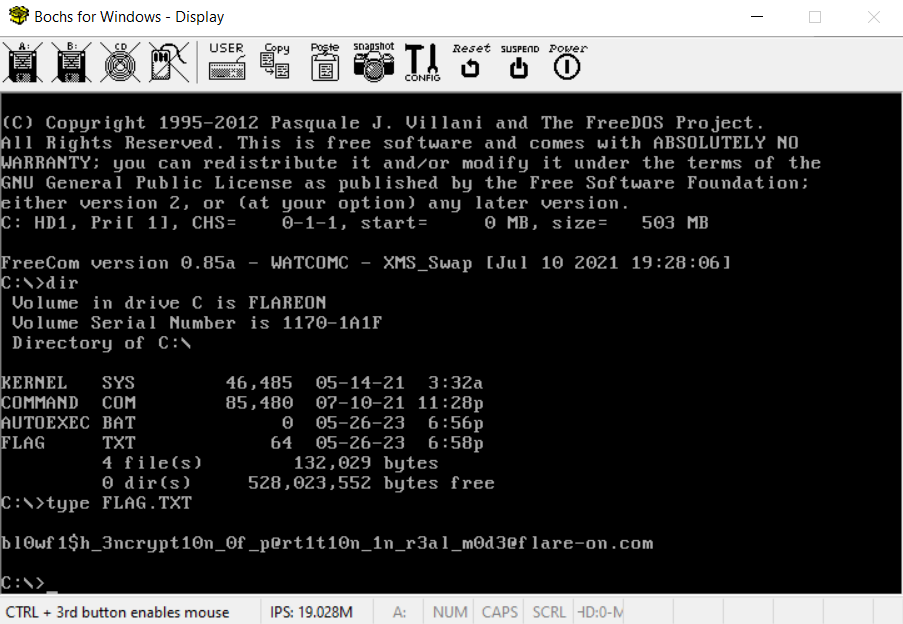
Obviously, the disk was encrypted using the Blowfish cipher but this was not needed to solve this challenge.
I’m told this one is easy if you are really good. Based on your solve times so far Google Bard predicts your performance will be: “1 out of 5 stars. I’d give it 0 stars if I could. Food arrived over an hour late, covered in oil. I wouldn’t feed it to my dog”
This one is another ransomware related challenge, but this time we have a PE executable developed in C++. An encrypted file named very_important_file.d3crypt_m3 is also provided, the goal of the challenge is to decrypt it.
The executable expects one command line parameter: the directory path containing files to encrypt.
Once executed, the program starts two threads:
- one thread iterating over files in the target directory, checking for each file if its extension matches
.3ncrypt_m3and sending it to the other thread if it does; - a second thread encrypting a file contents and writing the output to a new file whose extension ends with
.d3crypt_m3.
Looking closer at the cryptography used, we can identify that the ChaCha20 stream cipher is used to encrypt files with an ephemeral key. More precisely, this algorithm needs an initial state, arranged as a 4x4 matrix of 32-bit words.
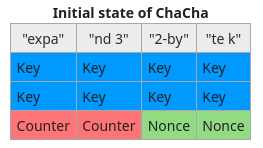
In this case, it is worth to note that the constant expand 32-byte k is put at the last four words of the state instead of the first four ones. The rest of the words are generated by the pseudo-random generator of OpenSSL.
The state is passed to a block routine applying add-rotate-XOR (ARX) operations and the output key stream is XOR-ed with the file contents. The result is XOR-ed with a second key of 24 bytes, also randomly generated using OpenSSL PRNG. In a nutshell, a file is encrypted using the following algorithm.
for i in range(file_size):
  if (i & 63) == 0:
    chacha20_block(a1, state_in, state_out);
  output[i] = file_data[i] ^ state_out[i & 63] ^ xor_key[i % 24];
The ChaCha20 initial state and the XOR key are encrypted with RSA. For that purpose, a RSA 2048-bit public key is embedded in the implant. Interestingly, the RSA encryption is actually applied on a 256 bytes buffer and not only on the key materials. This buffer has the following structure.
struct rsa_input {
  char null_bytes[168];
  char xor_key[24];
  char chacha20_state[64];
}
Once encrypted, this structure is appended to the end of the encrypted file. At this point, it is clear we have to find a weakness in the RSA encryption in order to recover the XOR key and the ChaCha20 initial state.
RSA public key is composed of a modulus N and a public exponent e. The encryption consists to do a modular exponentiation of the cleartext (encoded as an integer) using these two components.
ciphertext = pow(cleartext, e, N)
RSA relies on the difficulty to factor the product (N) of two large numbers (p and q). Here N is large enough (2048-bit) so it is not possible to retrieve p and q in practice.
Another category of attacks is related to the size of the public exponent. If the latter is small enough (equal to 3) and cleartext^3 is smaller than N, then it is possible to decrypt the ciphertext by computing its cube root.
Back to our case, it turns out the public exponent is 3 however the cleartext is slightly too large. Indeed, the buffer is 256 bytes long but the first 168 bytes are null, which leaves 88 non-null bytes and 88 * 8 * 3 = 2112 bits > 2048 bits.
That being said, we know a part of the cleartext as the last 16 bytes must be equal to expand 32-byte k. Because of that, it is possible to use the Coppersmith method in order to decrypt the ciphertext. I will not go into details on the mathematics behind as this is already well described on the previous link. This method is implemented by several computer algebra system, personally I chose to use SageMath as it is based on Python.
Once installed, SageMath provides an IPython shell by running sage.
$ sage
┌────────────────────────────────────────────────────────────────────┐
│ SageMath version 9.8, Release Date: 2023-02-11                     │
│ Using Python 3.11.6. Type "help()" for help.                       │
└────────────────────────────────────────────────────────────────────┘
sage:
First, we need to define our variables. Here, c corresponds to the RSA encrypted data (last 256 bytes of the encrypted file) encoded as integer.
sage: e = 3
sage: N = 25470150703730072315086034936055649836295236884601534304156993296936285040601301375939610442634162257314189499275100972455566398455602026574433195970815202585090501432569441133857842325042217925159448570072586058996240505604332536419689764920477213974406475165093073579216369638057129512420088827606714396031123135244463251843168817519429473193827165432916372277360150211932008151288302906204095482949720169306181114320172114379252171541724857670073249548632622866650173757036971232388781059615489960396402755953330835572369467647829965472365925514887194394952977362957692659807638830075891677256168792219800752995169
sage: c = 2425592482954093142911053394287864523808964564181573160646727426912420816161421295499810615636292488448086115375476578572126347389008149317940146698511301628342882097728861790163917385171608505786502099378180432350549613073164000743046053171252337966368352372410009389267473352698726296264255749133362831429534971651466910078754923485995987572417696906602747262956933918749969313809832939636800411857199483428558375468904127868025514462771636245588377871475012975670951402940280762132382274242486303138563790236596067661371781157135962527788369561955804123957047366621254000506424769282365883497834294487244664347316
Then, we define the cleartext m as a sequence of null bytes (representing the unknown bytes) followed by the known cleartext.
sage: m = b"\x00"*72 + b"expand 32-byte k"
sage: m = int(m.hex(), 16)
The Coppersmith attack is done on a monic polynomial (single variable and the leading coefficient is 1) modulo N. Here, we have the polynomial
\(f(x) = (m + 2^{128}x)^e - c \mod N\) however it is not monic. Luckily, sage can make it monic for us.
sage: P.<x> = PolynomialRing(Zmod(N))
sage: f = ((m + (2**128)*x)^e) - c
sage: f = f.monic()
Finally, we can run the Coppersmith method on our polynomial. In sage, this is implemented by the small_roots() function. The latter can take a parameter named epsilon determining the running time. By default, it is equal to 1/8. In this case, it needs to be set to 1/20.
sage: f.small_roots(epsilon=1/20)
[6730722853673567334832243774533669260003790577373139776704376326794058404121535292812433356801604068239665891105595607303018172210866035032633357162971325439700251947045071]
After getting the XOR key and the initial state, I decrypted the file by reimplementing the decryption algorithm in Python (script available here).
The flag is Wa5nt_th1s_Supp0s3d_t0_b3_4_r3vers1nG_ch4l1eng3@flare-on.com
This is the second smallest challenge this year! If only that mattered.
I think this challenge was my favourite this year. It is a PE executable that leverages the Windows Hypervisor Platform API to implement an obfuscation mechanism.
The executable expects two command line parameters, both have a constrained length:
- first one length is higher than 8 and lower than 48;
- second one length is higher than 24, lower than 56 and must be a multiple of 4.
After checking the parameters length, the program makes use of several functions of the Windows Hypervisor Platform API. This user-mode API can be used to create and manage partitions (logical unit of isolation in Hyper-V), memory mappings for the partition and virtual processors. The whole API is documented on MSDN.
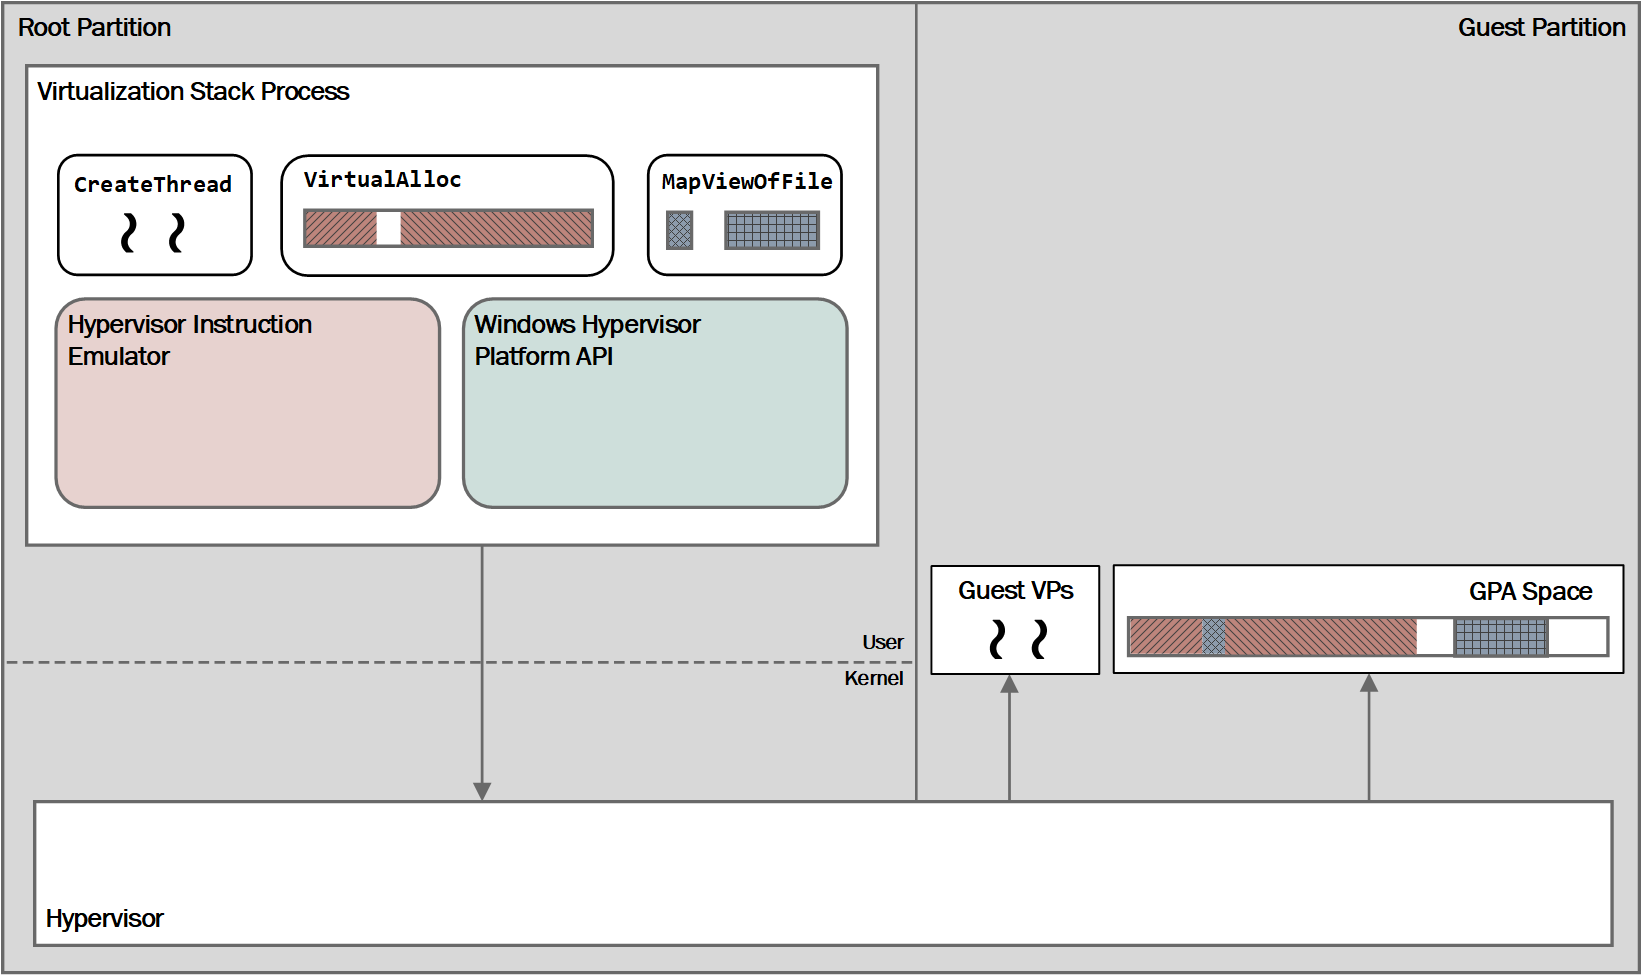
In this challenge, this API is used as follows.
- Create and setup a new partition using WHvCreatePartition(), WHvSetPartitionProperty() and WHvSetupPartition().
- Configure a memory mapping for the partition through WHvMapGpaRange().
- Create a virtual processor with WHvCreateVirtualProcessor().
- Set some registers (
RAXand theCSsegment register) of the virtual processor using WHvSetVirtualProcessorRegisters()). - Copy the shellcode to run (stored in a PE resource) to the memory mapping.
- Copy the user inputs to the memory mapping.
- Enter a while loop and run the virtual processor using WHvRunVirtualProcessor().
The function WHvRunVirtualProcessor() takes a pointer to a WHV_RUN_VP_EXIT_CONTEXT structure. When the execution of the virtual processor terminates, it indicates the exit reason and gives some context values.
Here, the program verifies if the exit reason is WHvRunVpExitReasonX64IoPortAccess. The latter occurs when the virtual processor was executing an I/O port instruction such as in or out. In both cases, registers R8 and R9 and RIP are read. The value present in R8 is used as a RC4 key and R9 contains the size of the data to process. However, depending on the instruction, the data pointer differs:
- if a
ininstruction triggered the exit, then the keystream is applied on data atRIP + 2; - if a
outinstruction caused the exit, then the keystream is applied on data atRIP - R9 - 16.
After using RC4, the instruction pointer is incremented by 2 and the virtual processor execution continues.
At this point, we understand that a in instruction triggers an exit in order to decrypt some code at RIP + 2 and the execution continues there. Whereas a out instruction likely leads to encryption of code already executed (at RIP - R9 - 16).
The virtual processor execution is definitely terminated when the exit reason is WHvRunVpExitReasonX64Halt (execution of halt instruction).
Finally, the program checks if the value of RAX (in the virtual processor) is equal to 0x1337 and if it is, the flag is decrypted using the second command line parameter as a XOR key.
After extracting the resource containing the shellcode executed by the virtual processor, I added it to IDA as a new segment and started analyzing it.
The 64-bit entrypoint is at the offset 0xCF2 of the shellcode.
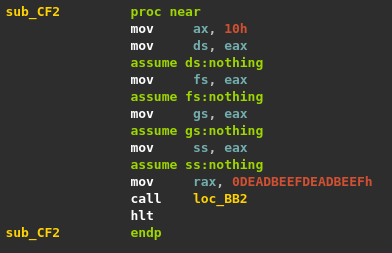
After entering the function, we get our first in instruction followed by encrypted data.
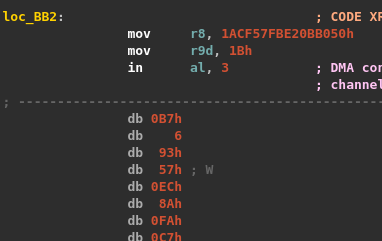
From what we understood during the analysis of the hypervisor, R8 contains the RC4 key, R9 the size of data to decrypt and RIP + 2 points to the data. Decryption can be done using a few lines of IDAPython.
import ida_ua
import ida_bytes
import ida_kernwin
from Crypto.Cipher import ARC4

ea = ida_kernwin.get_screen_ea()

insn = ida_ua.insn_t()
length = ida_ua.decode_insn(insn, ea)
rc4_key_int = insn.ops[1].value
rc4_key = rc4_key_int.to_bytes(8, byteorder="little")

ea += length

length = ida_ua.decode_insn(insn, ea)
data_size = insn.ops[1].value

ea += length + 2

data = ida_bytes.get_bytes(ea, data_size)
dec_data = ARC4.new(rc4_key).decrypt(data)
ida_bytes.patch_bytes(ea, dec_data)
Running this script decrypts the actual instructions of the function. As expected, a out instruction is executed before the function returns to encrypt it again.

From there, it appears that all the functions of the shellcode seem to be wrapped by these decryption and encryption routines. The RC4 key is unique for each function and obviously the size differs as well. However, the instructions opcodes of these routines and the operands of the in and out instructions remain constant from one function to another. Thus, it is possible to use the following search pattern to find all the encrypted functions and progressively decrypt them.
49 B8 ?? ?? ?? ?? ?? ?? ?? ?? 41 B9 ?? ?? ?? ?? E4 03
Obviously, the process of searching and decrypting can be automated using a few more lines of IDAPython, my script is available here.
Once the functions are all decrypted, getting the first parameter value is straightforward as it is simply XOR-ed with the key loremipsumloremipsumloremipsumloremipsumloremips and the result is compared with an hardcoded value. This gives the following string for the first input.
FLARE2023FLARE2023FLARE2023FLARE2023
Retrieving the second parameter is a bit more complicated. It is decoded using base64 and decrypted through a slightly modified Salsa20 cipher. Then, the result is compared with the first parameter, the success value (0x1337) is returned if it matches.
From there, I chose to emulate the modified Salsa20 to reverse the process and retrieve the second parameter. My script based on miasm is available here. The script also decrypts the flag.
Second parameter: zBYpTBUWJvf9MUH4KtcYv7sdUVUPcjOCiU5G5i63bb+LLBZsAmEk9YlNMplv5SiN
Flag: c4n_i_sh1p_a_vm_as_an_exe_ask1ng_4_a_frnd@flare-on.com
So close to the end you can almost taste it. Keep going champ, complete this challenge and take your place as one of the Reverse Engineers of All-Time.
The last challenge is a PE executable obfuscated with spaghetti code.
After opening the executable in IDA, we quickly realize that we are dealing with spaghetti code: each basic block is composed of one relevant instruction and one jump instruction leading to the next basic block.
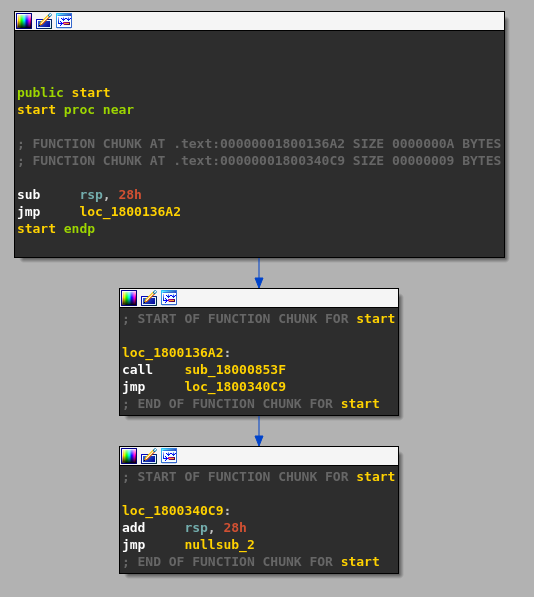
There are many ways to defeat this obfuscation, and actually IDA is able, to a limited extent, to natively deal with it using function chunks. As many disassemblers, IDA has a support for functions split into several disjoint ranges. Each contiguous range of instructions is named chunk. The chunk at the start of the function is named entry chunk whereas the others are called tail chunks. A tail chunk may be shared by multiple functions. Chunks are usually detected during autoanalysis, however when it is not the case, they can be manually added or removed, from the UI (Edit > Functions > Append/Remove function tail) but also using the API.
My strategy consisted to use IDAPython to reconstruct each function via function chunks, and then take advantage of the decompiler optimizations (or in other words pressing F5) to get deobfuscated functions close to the original source code. For that purpose, we first need to undefine the existing functions created by IDA during autoanalysis except the function at the entry point. This can be easily done using the following snippet of code.
import idautils
import ida_funcs
import ida_idaapi

inf = ida_idaapi.get_inf_structure()
for func_ea in idautils.Functions():
    if func_ea == inf.start_ip:
        continue
    ida_funcs.del_func(func_ea)
For each obfuscated function, the algorithm to deobfuscate it is the one described below.
- Identify the last tail chunk of the function and add the jump location to the todo list.
- Pop an address from the todo list. Stop the algorithm when the list is empty.
- If the block pointed by the address already belong to the function, go to step 2.
- Delete existing code at this location and disassemble again to get the correct instructions.
- If the first instruction is a
ret, create a tail chunk containing the instruction, append it to the function and go to step 2. - If the first instruction is a conditional jump, put the jump location in the todo list.
- If the second instruction is not a
jmp, then raise an error for unsupported code pattern. - Create a tail chunk from the two instructions and append it to the function.
- Add the unconditional jump location to the todo list and go to step 2.
The script implementing this algorithm is available on my Github.
Once the functions are reconstructed, there is one last step before enjoying the decompiler output: fixing the calling conventions and the stack frames. Usually, this is automatically done by IDA but as the function reconstruction was done manually, it is necessary to tell IDA how large is the stack, how many parameters are passed, and so on. I did not manage to automate this part as some functions are using custom calling conventions but fortunately, there are not a lot of functions to fix.
The program starts with reconstructing a few strings and a beautiful Yoda in ASCII art on the stack.
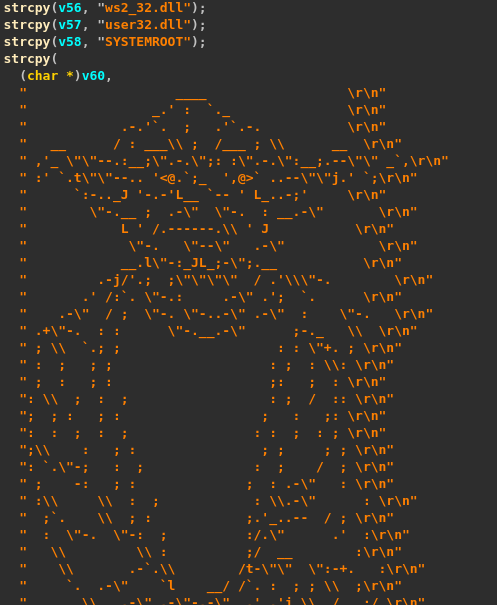
The DLL names shown on the screenshot above are used to resolve several Windows API functions through the import-by-hash technique. Mandiant provides a SQLite database containing a lot of function names hashes, this is quite useful to deal with this technique.
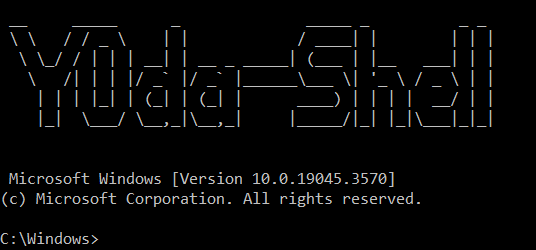
Then, a network socket is created to listen for TCP connections on port 1337. When a connection is initiated to this port, we get access to a command line shell (by running %SYSTEMROOT%\\%COMSPEC% in a new process).
Two threads are started to handle connections received on the socket:
- one that receives data from the socket, processes it and forwards it to the other thread;
- a second one processing incoming data from the first thread, and eventually sending the output to the socket.
The first thread handles two special cases:
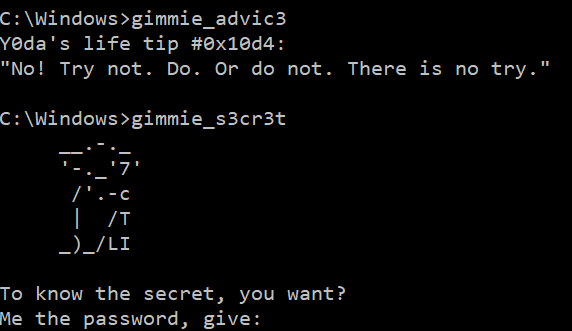
- incoming data is equal to
gimmie_advic3, then it randomly picks an “advice” and writes it to the socket; - incoming data is equal to
gimmie_s3cr3t, then it asks for a password and if the latter is correct, it uses it as a RC4 key to decrypt a resource embedded in the executable.
The password is split in four parts, separated by the _ character. For each part, its MD5 hash is computed and checked against a hardcoded one. The four MD5 hashes as well as their corresponding clear value are given below.
4c8476db197a1039153ca724674f7e13: patience
627fe11eeef8994b7254fc1da4a0a3c7: y0u
d0e6ef34e76c41b0fac84f608289d013: must
48367c670f6189cf3f413be394f4f335: h4v3
After entering the good password, we do not get the flag though, but a weird string looking like base64 encoded data.

Decrypting the resource using the password as a RC4 key does not produce better results as we get a false flag.

At this point, we understand we need to go deeper by analyzing how the second thread processes data before writing this weird encoded output.
After reading the decrypted resource, the second thread looks for two 32-bit markers into it:
0x3BAAE1FF;0xC5A1E2FF.
Both markers can be found at the end of the resource, respectively at offsets 0x1B0F1 and 0x1B12E. They are used to extract two chunks of data: one of 57 bytes and a second one of 451 bytes.
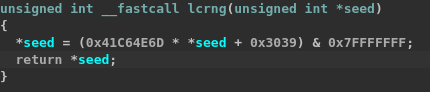
Then, a Mersenne Twister PRNG is instantiated using a seed set in the main function (0x10d4). Interestingly, the seed is first passed through a linear congruential generator known to be used in Pokémon Machine v2 distributions (see here for more details).
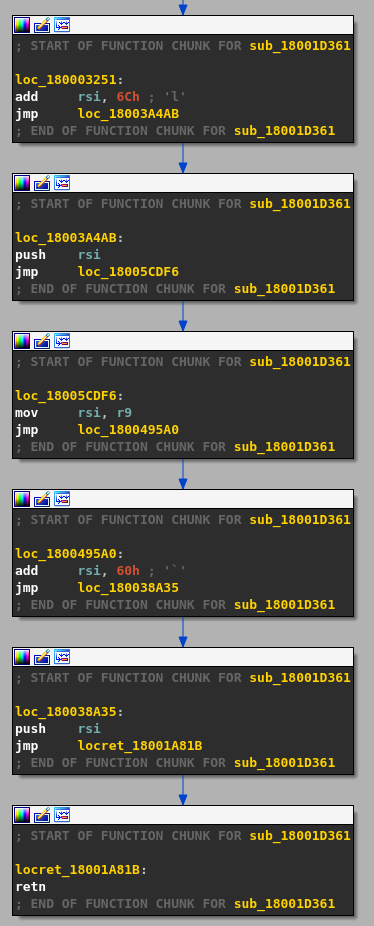
The Mersenne Twister is used to generate 60 pseudo-random bytes. These bytes and the two chunks of data extracted from the decrypted resource are passed to a routine at 0x18004936E. The latter iterates over each byte of the first chunk, and gives it to a second routine at 0x18001D361. Here is the decompiler output for this one (after deobfuscation and fixing the calling convention).

Looking at the disassembly explains why the decompiler is blind: this function purpose is to build a ROP chain using the gadgets present in the second chunk and then to jump to it.
One way to reconstruct the actual assembly code executed by the ROP chain is to put a breakpoint before the jump to the chain entry, dump the addresses of the gadgets on the stack, and retrieve the corresponding instructions by reading the second chunk. After creating a new segment in IDA for this function, we get the following decompiler output (partial as the function is too large).
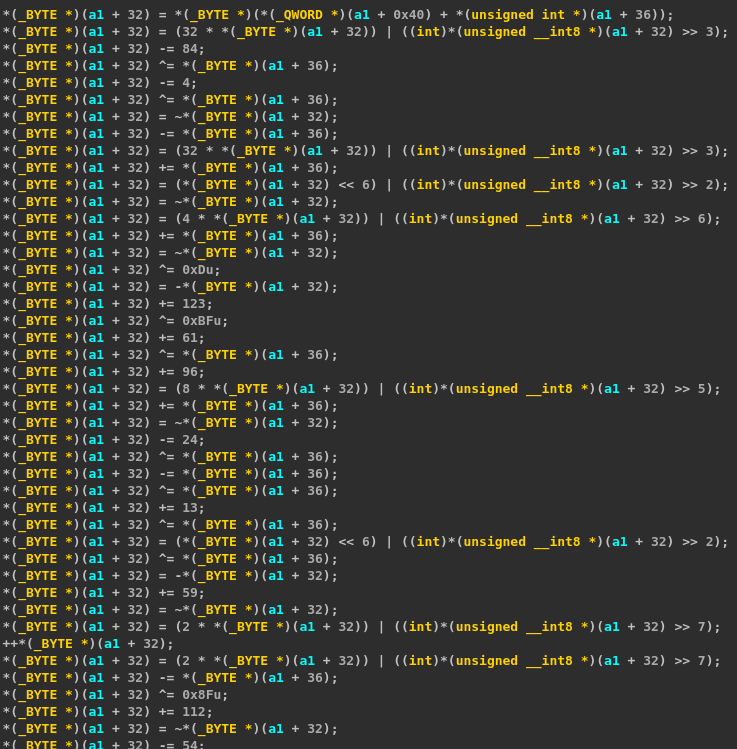
As one can see, the function applies a lot of MBA (Mixed Boolean-Arithmetic) expressions on the byte given as input. At first, I thought this could be simplified using a MBA expression simplifier like Arybo but I did not get good results. Besides, at the end of the function, another set of MBA expressions using the data generated by Mersenne Twister is applied on the resulting byte. A Python implementation of this transformation is given below.
res = (4 * random[i+3] & 0xFF) ^ (random[i+2] >> 1 & 0xFF) & (2 * random[i+1] & 0xFF) ^ random[i] ^ b) & 0xFF)
After processing the first chunk, the result is encoded using base32 with a custom alphabet and finally written to the socket.
The following diagram sums up the whole process.
flowchart LR
A(JPEG) --> B(Encrypted flag)
A --> C(ROP gadgets)
B --> D{Decryption routine}
C --> D
E(Seed) --> F{LCRNG}
F --> G{Mersenne-Twister}
G --> D
D --> H{Base32}
H --> I(Output)
At this point, I initially thought it was necessary to bruteforce the seed in order to get the flag decrypted. I lost plenty of time in doing that (notably in reimplementing the decryption routine in C) however this was not the solution. Actually, I found the flag by chance when I tried to get the output of the decrypted routine before the usage of the Mersenne-Twister data in order to debug my brute-force algorithm. To understand the expected solution, the previous diagram should actually looks like this.
flowchart LR
A(JPEG) --> B(Encrypted flag)
A --> C(ROP gadgets)
B --> D{Decryption routine}
C --> D
E(Seed) --> F{LCRNG}
F --> G{Mersenne-Twister}
D --> H(Flag)
H --> I{Encryption routine}
G --> I
I --> J{Base32}
J --> K(Output)
The flag is P0w3rfu1_y0u_h4v3_b3c0m3_my_y0ung_flareaw4n@flare-on.com.