FCSC 2020 - Keykoolol
A few weeks ago, I participated in the France CyberSecurity Challenge (or FCSC in short); a Jeopardy CTF organized by the National Cybersecurity Agency of France (ANSSI) to select the french team that will participate to the European Cybersecurity Challenge (ECSC) at the end of 2020.
Among the challenges proposed (crypto, reverse, pwn, web, forensic, hardware), I really liked doing one of the reverse track named keykoolol.
The purpose of this challenge is to analyze a binary that takes a username and a serial as inputs and write a keygen for it. Then, we have to use this keygen to generate good serials for several usernames to get the flag.
As I spent a bit of time to solve it, here is my solution for the challenge.
The binary is an ELF x86-64 executable and its size is quite small, only 14KB.
$ file keykoolol
keykoolol: ELF 64-bit LSB pie executable, x86-64, version 1 (SYSV), dynamically linked, interpreter /lib64/ld-linux-x86-64.so.2, for GNU/Linux 3.2.0, BuildID[sha1]=1422aa3ad6edad4cc689ec6ed5d9fd4e6263cd72, stripped
If we execute it with dummy inputs, we get the following output.
$ ./keykoolol
[+] Username: aaaaaa
[+] Serial:   bbbbbbbbb
[!] Incorrect serial.
Let’s open it in our favorite disassembler to see what the code looks like. Here is what the main function looks like with IDA decompiler.
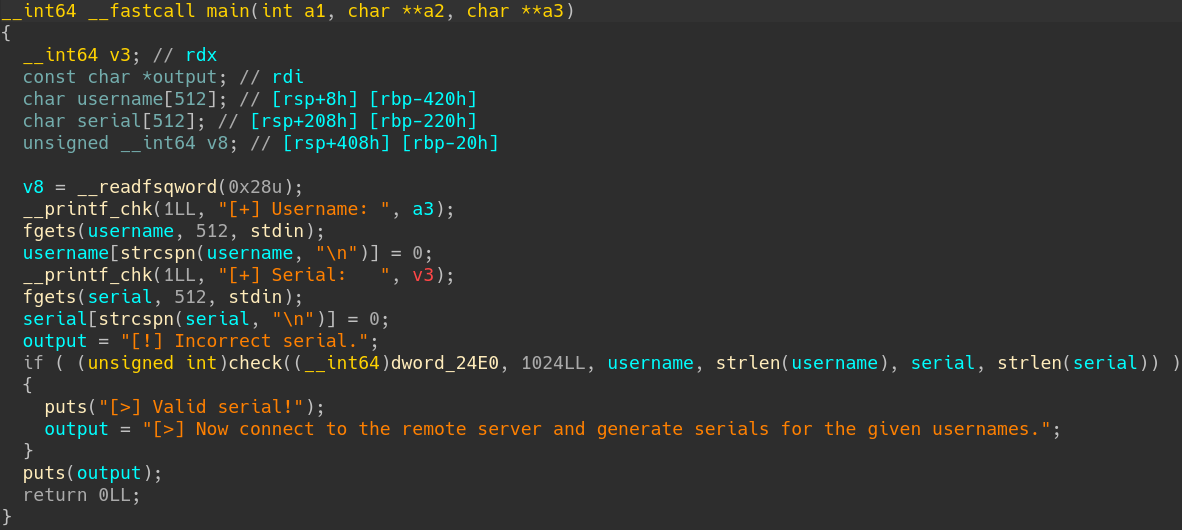
IDA decompiler output of main function
As you can see, the code of the main function is easily readable and consists of the following steps.
- Read the username and the serial from stdin.
- Remove the new line character of both inputs.
- Call a function (renamed as
checkhere) taking 6 parameters including the username, the serial and their respective lengths. - If the function return value is different than 0, the couple username/serial is correct.
Without further ado, let’s look at the function check.
When opening the check function in IDA decompiler, the first thing we notice is the time taken by IDA to decompile it.
If we look at the disassembly control flow graph, we quickly understand why, the function is huge!

IDA disassembly CFG of check
Let’s dig into the code to understand the structure of the function.
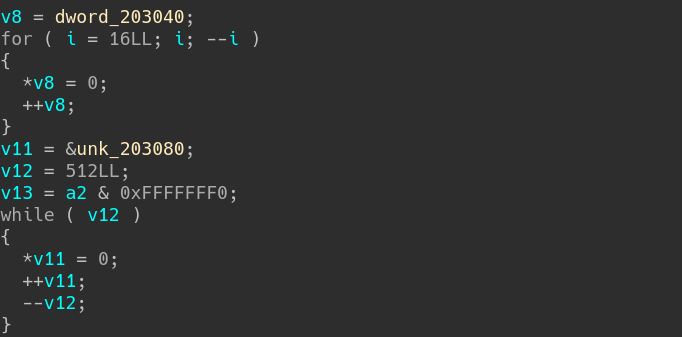
IDA decompiler output of check function - 1
The function starts with initializing the first 40 bytes at 0x203040 and the first 2048 bytes at 0x203080 to 0.
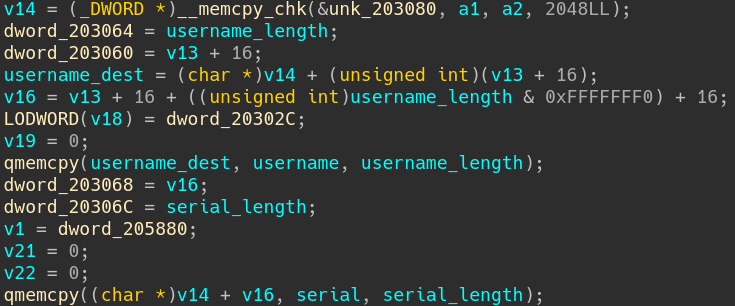
IDA decompiler output of check function - 2
Then, it copies successively:
- the buffer at 0x24E0 (first parameter of the function) to the address 0x203080;
- the username buffer to the address 0x203490 (0x203080+1024+16);
- the serial buffer after the username buffer address plus 16.
Afterwards, it enters into an infinite loop and reads an integer of 32 bits from the buffer at 0x24E0 (which is now at 0x203080).
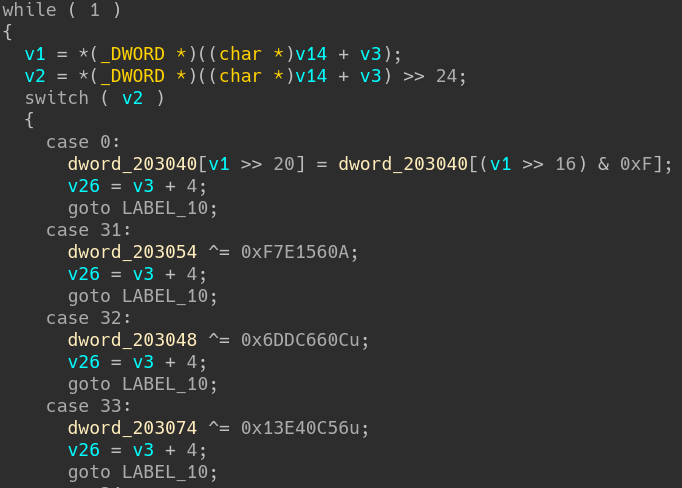
IDA decompiler output of check function - 3
The most significant byte of the 32 bits integer is read and, depending on the value, the control flow moves to one of the 256 entries of the switch (this explains the stair-like structure of the CFG).
If we look carefully at the different branches of the switch, we can observe the following code pattern in almost every branch of the switch:
- A simple operation is made on the memory between 0x203040 and 0x203080.
- A variable is increased by 4 (which is incidentally the same size of the integer read before entering the switch).
- If the switch value is different than 255, the control flow goes back to the start of the while loop.
This structure leads us to conclude that we are dealing with a virtual machine here, and not a small one as it implements 256 instructions.
From here, we can make several assumptions on the structure of the virtual machine:
- the VM has 16 registers of 32 bits, stored at 0x203040;
- the mysterious buffer copied from 0x24E0 is the bytecode of the VM;
- the VM program counter is stored into ESI;
- the VM flags (more or less equivalent to a very simplified version of the EFLAGS register) are stored into R9;
- the execution of the opcode 255 means the serial is not correct as it sets the return value of
checkto 0; - the memory at 0x203880 corresponds to the stack of the VM.
Also, we can evaluate the real opcodes executed by the VM by looking at the differents opcodes present in the bytecode. However, this implies that the code of the VM does not patch itself (SPOILER: it does).
Still, here is the list of the 55 different opcodes present in the bytecode preceded by the number of occurrences.
23 15
22 212
16 0
14 216
13 8
13 19
12 29
12 12
8 24
8 18
7 2
6 6
6 202
5 223
5 21
5 11
4 25
4 221
4 220
4 214
4 10
3 28
3 27
3 26
3 23
3 215
3 206
3 17
3 1
2 9
2 3
2 255
2 254
2 219
2 218
2 210
2 207
2 204
2 20
2 14
1 98
1 63
1 42
1 35
1 244
1 217
1 213
1 201
1 200
1 197
1 195
1 194
1 193
1 192
1 188
In order to disassemble the VM bytecode and continue the analysis, several strategies are at our disposal:
- implement each opcode in a Python script (for example) and read the bytecode with it;
- write an architecture plugin for the VM, supported by disassemblers like IDA or Binary Ninja and open the bytecode with it;
- make a trace of the VM execution and extract the VM instructions from it (using Triton for example).
As I am a bit lazy and I did not want to reimplement each instruction, I chose a solution somehow similar to the last one that consists to use Miasm dynamic symbolic execution (or DSE in short) to disassemble automagically every executed VM instruction. The ultimate goal is to get a clean trace of the VM execution. The advantage of this solution is that if the VM does self-modification, we can observe it and disassemble the modified VM bytecode.
I will not present the concepts of symbolic execution1 and concolic execution2 here as they are already good definitions on the Internets.
The usage of Miasm dynamic symbolic execution is not really documented (as the whole project actually) but you can find examples on Miasm blog and a pseudo-documentation in the code.
Besides, the developers of Miasm are easily reachable if you encounter an issue, either via the Gitter or directly via the GitHub repository.
Here is an illustration of what a VM cycle looks like in our case (drawing is not my main strength as you can see).
                      +------------+
                      |Fetch/Decode<--------------------------+
                      +-----+------+                          |
                            |                                 |
                            |                                 |
                            |                                 |
                      +-----v------+                          |
                      | Dispatcher |                          |
                      +------+-----+                          |
                             |                                |
       +--------------------------------------------+         |
       |                     |                      |         |
       |                     |                      |         |
+------v-------+      +------v------+      +--------v-----+   |
|  Handler 1   |      |  Handler 2  |      |    VM Exit   |   |
+------+-------+      +------+------+      +-------+------+   |
       |                     |                     |          |
       +-------------------------------------------+          |
                             |                                |
                      +------v------+                         |
                      |    Next     |                         |
                      +------+------+                         |
                             |                                |
                             +--------------------------------+
In order to disassemble a given VM instruction, we need to get the constraints on the VM state (registers + flags + stack) at each VM cycle.
- At the dispatcher, we update the DSE state from the concrete execution and we symbolize the memory corresponding to the state of the VM.
- The code of the handler corresponding to the VM instruction is executed.
- At the next step, we evaluate the modifications made on the DSE state and print them.
- If the instruction is not a VM exit, we go back to 1.
In Miasm, the concrete execution feature is provided by the Jitter, we can jit a ELF x86-64 executable by importing the class Sandbox_Linux_x86_64 defined in miasm.analysis.sandbox.
from miasm.analysis.sandbox import Sandbox_Linux_x86_64

parser = Sandbox_Linux_x86_64.parser("Disassembler for keykoolol challenge")
parser.add_argument("filename", help="Challenge filename")
options = parser.parse_args()

sb = Sandbox_Linux_x86_64(options.filename, options, globals())
sb.run()
When executing the Python code above, we encounter the following error.
$ python keykoolol.py keykoolol
[...]
ValueError: ('unknown api', '0x711110c4', "'xxx___printf_chk'")
As there are calls to external APIs, we have to handle them in our code.
def xxx___printf_chk(jitter):
    ret_ad, args = jitter.func_args_systemv(["flag", "format", "arg"])
    print(jitter.get_c_str(args.format))
    return jitter.func_ret_systemv(ret_ad, 1)

def xxx_fgets(jitter):
    ret_ad, args = jitter.func_args_systemv(["dest", "size", "stream"])
    s = input()
    jitter.vm.set_mem(args.dest, s.encode())
    return jitter.func_ret_systemv(ret_ad, len(s))

def xxx_strcspn(jitter):
    ret_ad, args = jitter.func_args_systemv(["s", "rejected"])
    s = jitter.get_c_str(args.s)
    jitter.vm.set_mem(args.s, s.strip().encode())
    return jitter.func_ret_systemv(ret_ad, len(s))

def xxx___memcpy_chk(jitter):
    ret_ad, args = jitter.func_args_systemv(["dest", "src", "len", "destlen"])
    src = jitter.vm.get_mem(args.src, args.len)
    jitter.vm.set_mem(args.dest, src)
    return jitter.func_ret_systemv(ret_ad, args.dest)
Once the handles are added, we can enter the username and the serial we want (here aaaaaaa and aaaaaaaaaaa) and observe the “execution” of the binary.
$ python keykoolol.py keykoolol
[...]
[INFO    ]: xxx___libc_start_main(main=0x730, argc=0x13371acc, ubp_av=0x140000, init=0x23a0, fini=0x2410, rtld_fini=0x0, stack_end=0x13fff8) ret addr: 0x88a
[INFO    ]: xxx___printf_chk(flag=0x1, format=0x2424, arg=0x99ccd668) ret addr: 0x76a
[+] Username:
[INFO    ]: xxx_fgets(dest=0x13fbc8, size=0x200, stream=0x71111064) ret addr: 0x77e
aaaaaaa
[INFO    ]: xxx_strcspn(s=0x13fbc8, rejected=0x2433) ret addr: 0x78d
[INFO    ]: xxx___printf_chk(flag=0x1, format=0x2435, arg=0x71111064) ret addr: 0x7a5
[+] Serial:
[INFO    ]: xxx_fgets(dest=0x13fdc8, size=0x200, stream=0x71111064) ret addr: 0x7b9
aaaaaaaaaaa
[INFO    ]: xxx_strcspn(s=0x13fdc8, rejected=0x2433) ret addr: 0x7c8
[INFO    ]: xxx___memcpy_chk(dest=0x203080, src=0x24e0, len=0x400, destlen=0x800) ret addr: 0x9c5
[INFO    ]: xxx_puts(s=0x24a9) ret addr: 0x834
[!] Incorrect serial.
Now we ensured the concrete execution works well, we add the DSE by instantiating the DSEEngine class. Also, we ask it to stub external APIs (similarly to the way the Sandbox does).
from miasm.analysis.dse import DSEEngine

[...]

dse = DSEEngine(sb.machine)
dse.add_lib_handler(sb.libs, globals())
However, this is not sufficient as the DSE also needs to be attached to the Jitter. To do so, it is possible to use the call to __memcpy_chk to attach it as follows.
def xxx___memcpy_chk(jitter):
    ret_ad, args = jitter.func_args_systemv(["dest", "src", "len", "destlen"])
    src = jitter.vm.get_mem(args.src, args.len)
    jitter.vm.set_mem(args.dest, src)

    global dse
    dse.attach(jitter)

    return jitter.func_ret_systemv(ret_ad, args.dest)
Afterwards, we set a breakpoint at the dispatcher to symbolize the memory corresponding to the registers of the VM, and we also create 2 dictionaries:
vm_registers_symb: containing the symbols of the VM registers;already_disass: keeping the VM instructions already disassembled in order to not print unrolled loops.
[...]
DISPATCHER_ADDR = 0xa5d
NEXT_ADDR = 0xa77

vm_registers_symb = {}
already_disass = {}

dse.add_instrumentation(DISPATCHER_ADDR, symbolize_vm)
[...]
The callback symbolize_vm is implemented as follows and corresponds to the strategy described above. The only difference relates to the opcode 30 that executes the aesenc3 instruction. As the latter is not currently implemented in Miasm jitter (and I did not take the time to try to implement it…), I added a dirty patch to bypass the execution of the corresponding handler.
from miasm.expression.expression import *

[...]

def symbolize_vm(dse):
    global vm_registers_symb, already_disass

    # update the DSE state (including the memory) from the concrete state
    dse.update_state_from_concrete(mem=True)

    # symbolize the memory corresponding to the VM registers (16 registers of 32 bits at 0x203040)
    for i in range(16):
        vm_registers_symb[ExprMem(ExprInt(0x203040 + i*4, 64), 32)] = ExprId("VM_R{}".format(i), 32)

    # symbolize the VM registers that correpond to real registers
    vm_registers_symb[dse.ir_arch.arch.regs.R9] = ExprId("VM_FLAGS", 64)
    vm_registers_symb[dse.ir_arch.arch.regs.RSI] = ExprId("VM_PC", 64)

    # update the DSE state with the VM registers symbols
    dse.update_state(vm_registers_symb)

    # get the VM state (PC, instruction bytes and opcode)
    vm_pc = int(dse.jitter.cpu.RSI)
    vm_instr = int(dse.jitter.cpu.RCX)
    vm_opcode = int(dse.jitter.cpu.RAX)

    # if the VM instruction was not already disassembled, we print the state and add a breakpoint at NEXT_ADDR
    if not vm_pc in already_disass or (vm_pc in already_disass and vm_instr != already_disass[vm_pc]):
        print("\n{:x}:".format(vm_pc), end=" ")

        already_disass[vm_pc] = vm_instr

        # VM opcode 0xFF exits the VM
        if vm_opcode == 0xFF:
            print("EXIT")

        # VM opcode 30 executes aesenc instruction but this instruction is not implemented in miasm jitter
        if vm_opcode == 30:
            arg0 = vm_registers_symb[ExprMem(ExprInt(0x203040+(((vm_instr >> 16) & 0xF)*4), 64), 32)]
            arg1 = vm_registers_symb[ExprMem(ExprInt(0x203040+(((vm_instr >> 12) & 0xF)*4), 64), 32)]
            dest = vm_registers_symb[ExprMem(ExprInt(0x203040+(((vm_instr >> 20) & 0xF)*4), 64), 32)]
            print("@128[{} + 0x203080] = AESENC(@128[{} + 0x203080], @128[{} + 0x203080])".format(dest, arg0, arg1))

        dse.add_instrumentation(NEXT_ADDR, disass_vm_instruction)

    # as we do not want miasm to raise an exception when aesenc is jitted, we jump after the instruction and update the DSE state accordingly
    if vm_instr >> 24 == 30:
        dse.jitter.pc = 0x232d
        dse.jitter.cpu.RIP = 0x232d
        dse.update_state({
            dse.ir_arch.arch.regs.RIP: ExprInt(0x232d, 64),
            dse.ir_arch.arch.regs.RAX: ExprInt(vm_pc+4, 64) # update pc
        })

    return True
As you can see, a breakpoint is added at the next step if the VM instruction was not seen before.
The callback disass_vm_instruction disassembles a VM instruction by extracting the modifications on the DSE state made between the dispatcher and the next step. In Miasm, those modifications are available in dse.symb.modified.
def disass_vm_instruction(dse):
    global vm_registers_symb

    vm_instr = ""

    # get memory modifications
    for dst, src in dse.symb.modified(ids=False):
        # do not print vm registers unchanged
        if dst in vm_registers_symb and src == vm_registers_symb[dst]:
            continue
        vm_instr += "{} = {}\n".format(dst.replace_expr(vm_registers_symb), dse.eval_expr(src))

    # get register modifications
    for dst, src in dse.symb.modified(mems=False):
        # dst = ExprMem(VM_REG)
        if src in vm_registers_symb:
            vm_instr += "{} = {}\n".format(dst, dse.eval_expr(src))
        # VM_REG != VM_REG_ID
        elif dst in vm_registers_symb and src != vm_registers_symb[dst] and vm_registers_symb[dst] != ExprId("VM_PC", 64):
            vm_instr += "{} = {}\n".format(vm_registers_symb[dst], dse.eval_expr(src))

    # if no modifications then print ZF and VM_PC changes
    if not vm_instr:
        for dst, src in dse.symb.modified(mems=False):
            if dst == dse.ir_arch.arch.regs.zf:
                vm_instr += "ZF = {}\n".format(dse.eval_expr(src))
            elif dst in vm_registers_symb and vm_registers_symb[dst] == ExprId("VM_PC", 64):
                vm_instr += "VM_PC = {}\n".format(dse.eval_expr(src))

    print(vm_instr.strip())

    # remove callback
    del dse.instrumentation[NEXT_ADDR]

    return True
The full script is available here.
First, let’s define the state of the VM registers before the execution of the first instruction.
VM_R0 = 0
VM_R1 = 0
VM_R2 = 0
VM_R3 = 0
VM_R4 = 0
VM_R5 = 0
VM_R6 = 0
VM_R7 = 0
VM_R8 = username buffer address in VM memory
VM_R9 = username length
VM_R10 = serial buffer address in VM memory
VM_R11 = serial length
VM_R12 = end of serial buffer address in VM memory
VM_R13 = 0
VM_R14 = 0
VM_R15 = 0
If we execute the script with the DSE and dummy inputs, here is the trace we get:
$ python keykoolol.py keykoolol
[...]
0: VM_R11 = VM_R11 + 0xFFFFFFFF

4: VM_FLAGS = {VM_R11 + 0xFFFFFF01 0 32, 0x0 32 64}

8: ZF = VM_FLAGS[0:32]?(0x0,0x1)
VM_PC = 0x74

74: VM_R0 = 0x0

78: EXIT
Traceback (most recent call last):
[...]
RuntimeError: Symbolic stub 'b'xxx_puts_symb'' not found
As you can see, the VM disassembler worked well, however the VM quickly exited because value of VM_R11 is different than 256. As we know VM_R11 corresponds to the length of the serial, we can conclude the serial length has to be equal to 256.
Also, an exception has been raised because the symbolic stub xxx_puts_symb was not implemented. As we do not really care of what the function puts prints, we can implement it like this.
def xxx_puts_symb(dse):
    raise RuntimeError("Exit")
Let’s execute again our script with a serial of 256 characters.
$ python keykoolol.py keykoolol
[...]
0: VM_R11 = VM_R11 + 0xFFFFFFFF

4: VM_FLAGS = {VM_R11 + 0xFFFFFF01 0 32, 0x0 32 64}

8: ZF = VM_FLAGS[0:32]?(0x0,0x1)
VM_PC = {(VM_PC + 0x4)[0:32] 0 32, 0x0 32 64}

c: VM_R0 = VM_R10

10: VM_R1 = VM_R12

14: @32[0x203880] = VM_PC[0:32] + 0x4

374: VM_R3 = 0x0

378: VM_R2 = VM_R0

37c: VM_R2 = VM_R2 + VM_R3

380: VM_R2 = {@8[{VM_R2 0 32, 0x0 32 64} + 0x203080] 0 8, 0x0 8 32}

384: VM_FLAGS = {VM_R2 0 32, 0x0 32 64}
[...]
This time, far more instructions are executed. As there are too many of them, it would not be readable if I print them all here. The full trace is available here.
I will not go through the analysis of each VM instruction. Instead, here are the different steps of the execution of the VM bytecode.
- Check if the length of the serial is equal to 256, if not exit the VM.
- Decode the serial from hexadecimal.
- Compute a custom “hash” of length 16 from the username (the exact algorithm is detailed below) and copy it after the decoded serial in memory.
def custom_hash(username):
    hash = [0] * 16
    for i, c in enumerate(username):
        for j in range(16):
            hash[(i+j) % 16] ^= ((((ord(c) + j) * 0xD) ^ 0x25) % 0xFF)
    return hash
- Decrypt the bytecode at 0xC8 (offset in the VM bytecode) with the XOR key 0xF4E3D2C1.
- Expand the custom hash as follows to get a buffer of length 96.
def expand_custom_hash(custom_hash):
    expanded_buffer = custom_hash + [0] * 80
    for i in range(80):
        expanded_buffer[i+16] = ((expanded_buffer[i] * 3) ^ 0xFF) & 0xFF
    return expanded_buffer
- Decrypt the bytecode at 0x148 (offset in the VM bytecode) with the XOR key 0xA1B2C3D4.
- Split the serial in 8 buffers of 16 bytes and perform 32 rounds of AES encryption with
aesencon the first 6 buffers of the serial as shown below.
def aesenc(buffer, key):
    # call aesenc instruction

# serial = buf1 + buf2 + ... + buf8
for _ in range(32):
    buf1 = aesenc(buf6, buf1)
    buf6 = aesenc(buf5, buf8)
    buf5 = aesenc(buf4, buf7)
    buf4 = aesenc(buf3, buf4)
    buf3 = aesenc(buf2, buf7)
    buf2 = aesenc(buf1, buf7)
- Decrypt the bytecode at 0x334 (offset in the VM bytecode) with the XOR key 0xAABBCCDD.
- Compare the encrypted serial with the expanded buffer computed from the username, if they match the serial is valid.
As you can see the VM bytecode patches itself not less than 3 times during its execution.
The length of the serial is of 128 bytes once hexadecimal decoded, but the last 2 buffers of 16 bytes are not checked.
As we know how the serial is verified, we can now implement our own keygen to generate a serial for any username.
I chose to implement the keygen in Rust, no reason in particular, except to improve my skills in programming with this language.
Regardless the language chosen for the implementation of the keygen, it has to implement the following steps:
- Generate the custom hash from the username with the algorithm detailed above.
- Expand the custom hash to get the AES encrypted serial.
- Perform 32 rounds of inverse AES encryption on the expanded custom hash (we cannot use the
aesdecinstruction as a round of decryption is different than the inverse of the round of encryption) to get the serial.
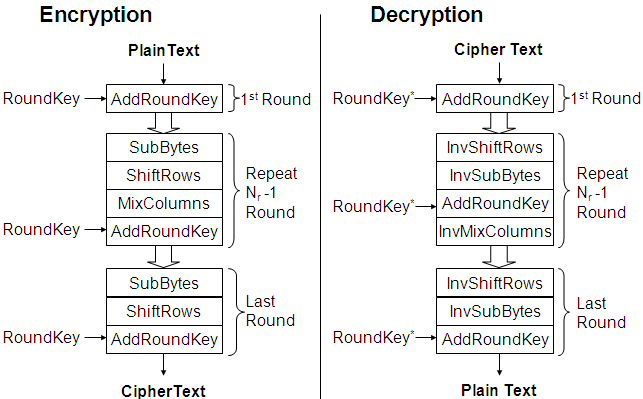
AES encryption/decryption flowchart
Here is one possible serial for the username admin with the last 2 buffers of the serial set to 1.
$ ./keygen_keykoolol admin 1
b40e0b81eb1d09c017b3c6d9001118a63b6a2377d1e14470531ee487fe9de34b86c949836a5d789baf503680717547b7910facdc11bd56c22626326ca7053d6ce72e2e638c1d0881c2e699c412485b567128c297e5c7cfa02b6f10b18dbbee140101010101010101010101010101010101010101010101010101010101010101
The code of my keygen is available here.
Once you had a functional keygen, you still had to communicate with the challenge server to get the flag.
$ nc challenges2.challenge-anssi.fr 3000
Give me two valid serials for username: Michael Barnett
>>> afaeff615f362ffbe36eccf4f2e80e6b18404cf0f96398e4881789c0c2b4310a58733ccd2273f48e4983fe171fdfed95d9867c67742609d24a4dbf6917742c41ba804a642b96c6792e8264454e120e26860480c292ab29537820ada4cb4b8edc0101010101010101010101010101010101010101010101010101010101010101
>>> 8e60f3338de9499d5bd3b9b2ab1371b11d61775ccf9575d47b5f669a04b60be01bf9299819c7f6eee12471fffba41f88d490854810aa62c7c23c554d65fbbdecf6eec3ebcb00f4126f09eee7281d694650942ab7e4b33a500343e83ca5d232720000000000000000000000000000000000000000000000000000000000000000
Give me two valid serials for username: Shelly Heilman
>>>
Unfortunately, I quickly understood that I needed to automate the communication with the server as there was not only one username to generate the serial of.
I chose pwntools as it offers a simple interface for this kind of stuff.
$ python get_flag.py
[...]
[DEBUG] Received 0x64 bytes:
    b'Well done! Here is the flag: FCSC{REDACTED}\n'
My script is available here.
Congrats if you have read this write-up to the end, I will try to be more concise next time !